Designing a New Kite
|
|
|
| Menu |
|
Home
About News Kites Kite Design - Why They Fly - Design - From Scratch - Bridling - Hints-n-Tips - Weird Ideas Kite Making Contributed Skateboards To-do Links |
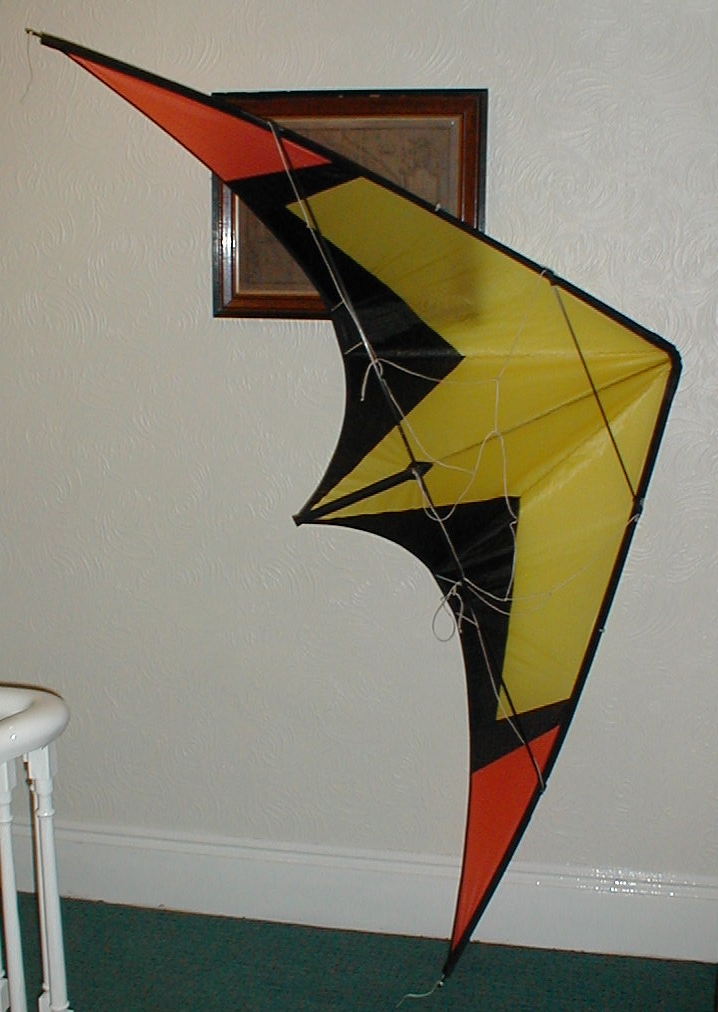
This page will follow the design of this kite, the Thornback:
Well at least thats how it looks this week because like everything else around here it too is still a work in progress...
I've already said that there's no magic formula from which we can derive the perfect kite, a new design usually comes about incrementally. If your expecting me to say if you want a kite that does this, do that, then stop reading now. It doesn't work like that sadly.
Now that's out of the way this is the process I went through to design a new kite; the Thornback which is my attempt to design something like the current crop of French inspired trick kites popular at the time of writing (2005).
When I designed the Acara I spent a lot of time modelling it with CAD software (Bentley Microstation). This was pretty succesful, I achieved what I wanted but the software I used was very expensive, beyond the scope of most amateur kite builders. I was only able to do it because part of my job included maintaining an office full of CAD systems. Since CAD only really enabled me to measure projected areas and get the shape to look about right I have designed this kite without any software modelling. So for this kite it will be a case of building a prototype, flying it and correcting the mistakes for the next one, albeit with some educated guesswork in the first place and knowing what to change to fix each of the flaws.
Making a Start
Shortly after designing the Acara, maybe 1998 or 1999, I got to fly a forerunner of the the current crop of French kites, 2 standoffs per side quite deep and pitch happy. At the time I didn't realise how pervasive this style of kite would become and to be honest I found it rather alien after years of floaty old school trick kites so I thought I would try to get some of the pitchyness and combine it with some of the float I was accustomed to. I wanted to try something similar based on the Acara. The resulting kite would become the Manta, then I'd take a couple of years out of kiting before picking up on those ideas again leading to the Thornback. I'll start with the Manta
One of the first things you need to decide when designing a new kite is the nose angle and close-up angle, that will give you your billow and the nose angle when the kite is flat. This also appears to be something which greatly troubles new kitemakers ( myself included, some of my early attempts came out either very flat or very pointy ). There are figures which generally seem to work well and you could calculate the close-up angles you need from there but why re-invent the wheel? With any kite we all start with influences from other kites. Not plaigurism but there will be kites you like or kites you've designed before from which you'll pick up a few ideas, fix the parts you dislike and borrow bits you think will work in your new design. Have a look at kites that fly roughly the way you have in mind for your new design and find out the nose angle when the kite is flat. In my case I used the Acara as my starting point
I took the nose angle of the Acara, nothing else, and widened it a little to give me a little more billow to account for the extra stand-off I would be inserting. At this stage it was pretty much guess-work but I would eventually test it by tacking the templates together with bits of tape to see what sort of shape I'd have when the frame went in. I drew in the spine and the leading edges as simple straight lines for now.
Because I have quite a bit of card I tend to draw straight on to card. Because the sheets of card I have are all A1 size I have to join them in a couple of places so I tend to make the first sheet the keel, then cut the right hand side at an angle to roughly where the standoff would be (purely a "That Looks About Right" guesstimate for now) then stick the next panel on to that, then add the wing tip on to that panel. The wing tip is often the spare from cutting a sheet for the keel.
Since this was to be a 2 standoff design, I made another cut from the nose to the other standoff ready for when I taped it all together to see what the shape would come out like. For the sake of making things easier to handle I cut off some scrap that would fall well outside the finished templates then tacked what I had so far together with bits of tape
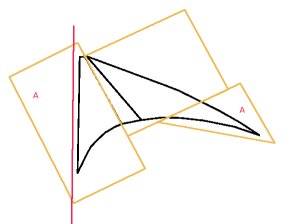
The next step is a bit chicken and egg. I wanted to work out my leading edge shape, but since I like to start the curve just abouve the lower spreader I needed to know where that would be. I took a piece of line, taped one end to the spine edge of the keel template and positioned the other end by eye so that it looked about at right angles to the spine and then pulled the templates into the shape they would assume on the real kite. This is a process I repeat several times as I work on a design, often taking a quick photo with my digital camera and mirroring it in The GIMP (or Photoshop or whatever).

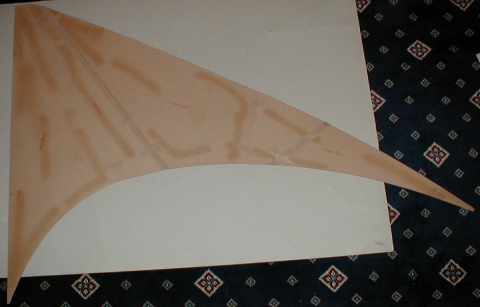
So now having a rough position for the lower spreader I laid out the templates again, took a length of 6mm carbon and bent it to get the leading edge curve. If you look at the black and yellow acara at the top of this page you can see that the curve starts about where the yellow panel starts, just above the spreader. As previously discussed in the pages about kite design, I dont like excessive curvature of the leading edge and I like to keep it straight for most of the leading edge above the lower spreader. Put too much curvature in here and you might struggle to get the leading edge to take up the right shape, leaving baggy patches just behind the leading edge.
Next I cut the excess card off the leading edge and measured from the nose to find out where the leading edge should end.
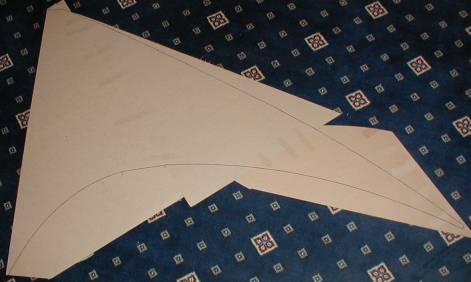
The next step was to finalise where the connectors would go on the leading edge and then get the trailing edge shape right.
First I reassembled the templates with the piece of line where the spreader would be then by eye, drew a line on the flat panel between the two standoffs so that it would be paralell with the spreader (or bit of line for now). Next I laid the templates out flat again and took a piece of 4mm carbon, lined it up with the line between the standoff positions and bent it to form a nice quarter-elipse trailing edge shape, tacking it to the templates with bits of tape in a few places. Then I just drew around the carbon to get the trailing edge shape.
For the upper spreader I reassembled the templates again and laid some carbon across about 20% down from the nose to establish where to put the leading edge cutouts. I marked where the contact patch on the spine should go too but this may need changing when the prototype is made.
A quick TLAR check and I sewed a kite from these templates. I bridled it with a quick 90 degree rule of thumb bridle (see the design pages on bridling) and it actually wasn't bad, very, very slow axles and 540s but it would flic-flac nicely, the tracking was OK, blah, blah, blah...
but this is just the beginning...Next I took two years out.
Revisiting the Manta
When I returned to kiting I found that things had moved on. Everything could backspin (whereas a couple of years before relatively few kites did it well), tail ballast and roll-ups were all the rage and Jacob's Ladders mandatory.
Since French kites were all the rage I started to play with the Manta again (since it was influenced by an earlier French kite) to see what it would do with a bit of weight (three 8mm bolts!). Surprisingly, it wasnt as embarrassing as I expected. Adjusting the bridle down and out a little, and with just one bolt it would backspin and Jacob's Ladder well. With the addition of a couple of cable ties for yo-yo stoppers and a bit more weight it rolled up quite well too although the frame was a little too flexible. The bad news (for me at least) was that it is a big kite, slow too so it's not exactly fun to throw around.
Thornback
While I was still on crutches I sewed a 3/4 version of the Manta just for a laugh, removing some of the billow in the process just to liven things up but just as a big, sluggish kite isn't a lot of fun, a small hyperactive kite can get tiresome too so I set out to design something new.
The parameters were straightforward enough:
- Smaller than full sized, bigger than 3/4 - a 1.5m leading edge similar to a lot of the more fun trick kites.
- 2 Standoffs per side (hey why be unfashionable!)
- Enough billow to Jacob's Ladder and recover from turtles
- Flat enough out toward the wingtip to backspin
- Not so much billow that rotational tricks were poor
This kite would be the Thornback.
The initial design process was much the same as described above for the Manta, essentially the nose angle was copied, then the panel between the stand-offs narrowed a little and a little taken off the panels either side to reduce the billow slightly to improve rotational moves. The leading and trailing edges were redrawn from scratch (remember that a 3/4 leading edge, being shorter is stiffer so it needs a gentler curve).
This resulted in the first prototype, which would get modified quite a lot. In its first incarnation the spreaders connected to the leading edge higher up giving a higher aspect ratio. A relatively high A/R and shallow billow reacted very badly to weights. It would roll-up in the way an old-school trick kite would but it was pretty poor on the whole (although despite being heavy it flew in remarkably light winds, so that supports the idea that high A/R kites are more aerodynamically efficient).
The next step was to bring the A/R down to something a little more conservative. The easiest way to do this for tesing purposes was to shove the spreader to leading edge connectors all the way down in their cut-outs. New standoffs and a new top spreader later the kite looked like this:
Looking at the photo a few things immediately fail the That Looks About Right test:
- The T-piece is way too high, about 25% up when it should be about 20%
- The trailing edge is cut too high to cope with a low/wide bridle
- The top spreader is too high
The obvious things listed above were easy enough to address in the next set of templates but a few other interesting things were apparent which could only really be felt as you flew the kite. These are a little difficult to describe but bear with me:
The kite had a little over-steer that I couldn't tune out, it felt as though I was steering it by the nose and as if the tail was dragging around after it - this was actually an effect of the trailing edge:
Imagine the part of the sail that runs wingtip - outermost standoff - nose - wingtip, now mentally picture the middle of this panel. If you sight down the lines the tow point of the bridle lies approximately over this point, you can move the bridle some way around this point but generally it will be somewhere near. With a very high cut trailing edge, this point is pushed up toward the nose. Effectively, I was steering the kite by the nose.
Aside from the handling this was the opposite of the low/wide bridle I was looking for for good backspins and roll-ups.
Leaving aside the effects on the bridle, the relation ship between the tail ballast, the axis of pitch rotation I wanted (roughly the spreaders) and the trailing edge was messed up too.
In the preceding section on the general effects of different design features I described an analogy which worked well for describing the feel of rotating objects:
Imagine a record on a turntable:
So for a snappy roll-up I wanted the ballast away from the axis of rotation for the most inertia but I wanted the bridle and the trailing edge close to the axis of rotation to get that snappy feel described above. With the trailing edge cut high, rather than making pitch rotation easier, it made two-pop roll ups so mushy that they really needed a lot of weigth to make them more positive. The downside of this was poor turtle recovery and poor Jacob's Ladders.
Thornback Mk II
By flying the the first prototype extensively, observing the weaknesses described above and more importantly understanding the reasons for those weaknesses I derived a list of things to change for the next prototype:
- Correct the position of the top spreader
- Lower the T-Piece
- Lower the trailing edge to match to stop tail hanging low in rotational moves
- Lower trailing edge to improve roll-ups
- Straighten the top of the leading edge to get rid of excess billow
- Narrow the nose to reduce the projected area and reduce pitch stability
- Straighten out the lower leading edge for better fabric tensioning (some bulges in first prototype)
- Revised and reinforced panel layout to cope better with rolled up flight.
Taking the templates for the first prototype:
I copied them onto some new card to make new templates:
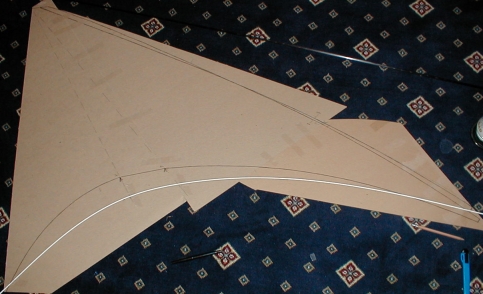
Then I straightened the leading edge a little, removing the curve at the top, straightening the curve at the bottom a little and moving the whole leading edge up about an inch as a result of making the nose narrower. I also marked a new, lower trailing edge using a length of 4mmfibreglass as a guide:
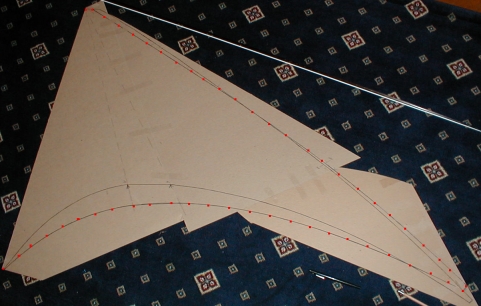
Finally, you can see the new shape indicated by the red dots:
Having made some templates and finalised spreader positions with bits of tape and string as described above, I sewed a sail.
This time I went for a panel layout similar to the Highly Strung Kites Aerial, this allowed me to keep the grain of the fabric aligned with the trailing edge as well as the leading edge which was important because I did not want the trailing edge to get stretched due to flying rolled up. Additionally, to cope with the wear and tear of roll-ups I edge the whole TE in chikara for the leech line tunnel, I put an additional reinforcement on the back of the sail and I put dacron over the trailing edge where the lines would hit it. Finally I added a strip of dacron from the velcro spine closure to the T-Piece to help cope with the strain on the bottom part of the sail when the sail bunches up in a yo-yo.
I made several holes for the stand-off clips and positioned the standoffs one in from each end to begin with. Positioning them is purely educated guess work, they will get adjusted as I go along. See the table describing the effects of stand-off positions in the design section for a few pointers.
I re-used the old bridle from the first prototype because it had plenty of adjustment in it. I was lucky, because moving the top spreader down had the effect of adjusting the bridle heavier so it flew straight out of the bag. A quick adjustment to lengthen the in-hauls by about 10cm and it was pretty good.
Results
It looks like most of the design objectives have been met:
- Precision is good
- Wind range is wide - it will trick in much more wind than I expected
- Roll-ups are there; one pop, two pop and from fades. Theyre not super fast but they're reliable
- Lazies, multi-lazies and impossibles are good, especially around 25g ballast
- The 540, slot machine, flic-flac are all there.
- The kite performs OK with up to 50g ballast before some tricks start to degrade.
- Slides and stabs seem OK
- Even I have cometed it!
Now it will be a case of flying it for a few months, fine tuning the bridle and fiddling with the stand-offs to see If I can get any more out of it.
If you would like to try building one, I've put the plans in the kitemaking section.
Caveat: This kite was designed to be an all-rounder, if you want something to do super fast roll-ups, if you like kites which require tiny hand movements or like a perfect floating 540 this is probably not the kite for you but in my opinion it seems to do a wide range of things pretty well.
Once I'm happy with this kite, I plan to derive my next kite from it, the next one will focus mainly on yo-yo performance. I will move the inner stand-offs out toward the others which will make roll-ups much quicker and I'll go for a completely straight leading edge too but this one will keep me happy for a while.
kitedesign/desscratch.html last modified 19:57:10 30-Jul-2017

This work is licensed under a Creative Commons Attribution-NonCommercial-ShareAlike 2.0 England & Wales License.