Sport Kite Design
|
|
|
| Menu |
|
Home
About News Kites Kite Design - Why They Fly - Design - From Scratch - Bridling - Hints-n-Tips - Weird Ideas Kite Making Contributed Skateboards To-do Links |
Talk to experienced kite designers and they will often tell you that a large part of what they do is based on a developed instinct, a kind of 'feel' which comes from flying lots of different kites and associating the differences in shape with differences in flight. Now life would be really simple if it were possible to bring all that together in some neat formula. Life is never that simple though, every change no matter how small has a multitude of effects in many areas of the kite's behaviour. Conversely if you want to change something about the way a kite flies, it is not possible to change just one thing and get the desired result, myriad small changes in a number of areas are usually required. Always bear that in mind.
The standard stunt kite
It might be useful to describe a 'standard sport-kite' so that comment can be made on the effects of changes to this generic design.
In 1990, in his book Swept Wing Stunt Kites Mark Cotrell put forward the idea of the standard sport-kite. Paraphrasing slightly, he proposed the following as a guide to the production of a "Standard Class" stunt kite:
- Any swept wing stunt kite planform allowed
- Sail area to be 9 ~ 15 sq. ft
- Leading Edge to be = 54 ~ 66 in
- Spine to be 24 ~ 40 in
- Nose angle to be 90 ~ 120 degrees
- Weight 10 ~ 20 oz
- No Ballast
- Any sail batten, stand-off, cross strut or bridle arrangement may be used
Mark Cotrell's 'Standard' was a little broader but in reality the standard stunt kite is now typified by a single spine delta sport-kite with the now ubiquitous A layout frame. Typically the leading edge and lower spreaders are made from 82.5cm spars (a hangover from the early days when kites were sparred in carbon fibre arrow shafts) giving a leading edge length of 165cm and a wingspan in the region of 8 feet. Typically the waste cut off from the upper spreader is ferruled to the tail end of the spine to give a spine length of around 1m.
Since many commercial kite makers will want to avoid the extra manufacturing process of cutting spars and / or want little waste as possible many commercial kites adhere closely to this.
Other subclasses of stunt kite have emerged including high wind 3/4 kites typified by a 125cm leading edge or trick kites with a 150cm leading edge. Again these dimensions have been derived from the materials popularly available at the time. At the time the Box of Tricks hit the market, Excel RCF 6 was the European universal standard cheap carbon, it was commonly supplied in 1.5m lengths. Likewise the Psycho set a trend for 3/4 kites, the spars it uses add up nicely to 1.5m in the right combinations.
Long or short spine
We have to start somewhere so lets start with the spine. Leading edge lengths tend to be pretty constant but spines vary considerably.
The spine on a stunt kite creates the keel of the familiar Rogallo wing shape. Aside from being a good place to connect T pieces and bits of frame, the keel has many effects on the way a kite handles in forward flight, turning and slack line moves.
Probably the most tangible effect of the keel is that it tends to stabilise the kite. Aside from resisting side slipping by poking out into the airflow, the keel is generally considered to contribute aerodynamic drag. This large draggy area in the middle slows the kite down. Although a rather subjective statement, a long spine large keel tends to impart a kind of inertia, or resistance to sudden speeding up or slowing down. A kite with a large keel area will tend to maintain a steady speed, whereas kites with shorter spines will tend to react more to changes in windspeed. This, however tends to go with the general design, long spines and wide keels are often found on big, low aspect ratio precision kites
The keel is created by the stand-offs pushing the sail back behind the spine so more on keels generally when we look at stand-off positions and sail shapes.
The spine is subject to considerably higher loading than you might expect. As a result the spreaders on typical stunt kites are positioned somewhere around 20 percent from top and bottom of the spine since this offers optimum support both for the spine and sail.
If the spreaders are kept in roughly these positions the first inevitable consequence of shortening the spine will be an increase in aspect ratio, simply put the kite gets wider as the spine gets shorter. More on aspect ratio shortly.
One of the most readily observed effects of changing spine length is it's effect on pitch stability. Think of pitch stability as the kites reluctance to change from flying normally to flipping on it's back or front etc. This is noticeable in tricks such as the Flic-Flac, Fade or Turtle. Typically short spine high aspect ratio kites take much less height to rotate about the spreaders, making Flic-Flacs faster and easier to accomplish. A long spined kite, thanks to the extra stability, is less inclined to flip around so is more inclined to stay put in a Fade or Turtle. A kites performance in any of these tricks obviously depends on other factors such as bridle settings.
The tail area.
Obviously not all kites keep the spreaders at 20 percent from the ends of the spine.
There is little to be had by significantly moving the upper spreader around beyond varying the static balance a small amount. Such subtle changes to static balance are probably better achieved by changing the spar weight. That said, provided it isn't ridiculously wrong static balance is not as great an issue as some would lead you to believe.
Most variation occurs in the tail region, i.e. the part of the keel below the centre T fitting. It is fairly common to keep the positions of the spreaders as they would be for a full-length spine but to then shorten the spine below the T piece. Be wary though, this can lead to some high loads in certain parts of the spine, potentially increasing the risk of breakage especially at the T piece. Also the shorter this part gets, the more the forces tensioning the leech line at the spine end are vectored perpendicular to the spine instead of parallel to it increasing the risk of breakage. Shortening the spine below the T will reduce the length of the keel which means less drag and slightly faster forward speed. Obviously this can also be achieved by moving the stand-offs inboard to but it's just another option if you want to speed the kite up.
Shortening the spine below the T will also decrease the pitch stability. This can be useful if you want to get more Flic-Flac ability out of a kite without going to a high aspect ratio. Given that the trailing edge on the tail section runs standoff to spine end (usually with a bit of an eliptical curve to avoid buzzing), a similar effect to a shortened tail can be introduced by narrowing the tail so while it remains long it doesn't have as much area.
Aside from the effects on pitch stability, changing the sail area below the T will change the kites aerodynamic balance. In simple terms if there is lots of sail area below the kites centre, when floating in the belly down or pancaked position, the kite will seem nose heavy. In some instances the kite will refuse to belly out at all. Conversely some short spined high aspect kites with little tail area can appear tail heavy and prone to over rotate when pancaked. The latter will typically be easier to Yo-yo though.
Low or high aspect ratio
What is Aspect Ratio
Probably the most apparent difference between kites is aspect ratio. This is the wing span divided by the chord or the width to height ratio and is often abbreviated to A/R. High aspect ratio kites tend to be short spined and wide, low aspect ratio kites are much taller, with long spines. Many older trick kites tend toward a high aspect ratios whereas precision kites are usually low aspect ratio. The current crop of Polyvalent kites usually fall somewhere between the two.
The effect of changes
One of the more significant variables in kite design is nose angle, i.e. the angle between the two leading edges. The greatest sail area is to be had when the leading edges are at 90 degrees to each other.
As the nose angle is increased from this the sail area is reduced so a higher aspect ratio sail may have less drive before it gets going fast enough to work as any kind of aerofoil.
A higher aspect ratio kite produces less tip vortex drag so that when it does get going and begins to function as an aerofoil it should fly more efficiently i.e. faster producing more lift.
Returning to the effects of spine length, a higher aspect ratio kite will have a shorter spine and less pitch stability: usually good for flic-flacs, not so good for precision. However if you are aiming to design something particularly good at rolling up dont assume that you should aim for a high A/R. High A/R kites tend to offer your best chances for a yo-yo [i]without[/i] added weights but they are comparatively slow to roll-up compared to weighted kites. Weighting a high A/R kite sometimes has a lot of detrimental effects, tail balast seems to work better on slightly lower A/R kites with a deep chord.
Wingtips
Another effect of increasing aspect ratio is that unless winglets or similar devices are used, the wing tips become narrower and 'pointy' with the result that turns typically become tighter and faster. This isn't a simple function of aspect ratio, but results from some of it's side effects.
Tip stall
The mechanism by which a kite turns is a mix of parts of the kite driving around the turn and the inside wingtip stalling and dragging back. In a turn the tip stalls (so slows down, the rest of the kite will try to pass it, hence turning) and more of the centre panel is presented to the wind (so tries to drive around the rest of the kite, hence turning). A high aspect kite typically has slim wing tips, these are more prone to stall, which gives can give tight turns. Tip stall however can result in oversteer. Oversteer is actually just the wingtips stalling and the brief moment of oversteer happens while the wing tip is trying to get it's act together again.
Over-steer is acceptable on a trick kite but a real problem for a precision kite. Precision kites often utilise winglets, increasing the size of the tip to avoid tip stall. They often make a wider pull turn and tend not to spin so wildly. This is not an issue however since most precision fliers will use a push turn and don't need tight spins to complete compulsory figures.
Also consider half a sail spine to tip. That may be further divided into the driving area between the stand-off, nose and wingtip and the draggy area between the stand-off , nose and tail. A kite where there is more area in the draggy panel than the driving panel tends to shift the aerodynamic centre of pressure closer to the spine. A kite with a centre of pressure close to the spine will turn tighter.
Another variable is how much the wingtips are twisted, this is known as washout. It is common to use additional stand-offs, whiskers from the leading edge or battens to twist the wing tip back just a little more than the rest of the sail. This stops the tip stalling in a tight turn. On some older kites with stand-offs close to the spine and wide flat outer sails, you may have noticed a tendency for the kite to luff in a tight turn. When this happens the kite loses it's way, struggling to complete the turn or in extreme cases even falling out of the air.
Washout.
Washout in loose terms is how much the wing tip is twisted. Twisting the wingtip around will cause the wingtip to stall later than it might normally and can be used to make a kite that can spin tight and even on the edge of the window without pulling out of the air. Have you ever flown an older kite with a flatter sail where you do a big pull turn near the edge and one wing tip luffs completely and the kite will lose it's way, often unrecoverably? Well that's a characteristic of not enough washout.
There are a number of ways to get some washout:
- Increasing the length of the main stand-off or moving it out toward the tip will increase the angle of the whole outer panel of the sail. This however comes with a lot of other less desirable effects.
- Often a couple of extra stand-offs are added out toward the tip to increase the angle of the outermost part of the sail. This is easy to design but can increase drag at the windows edge, reducing your useable window.
- Another method is the addition of a batten to create a winglet. This will give you dynamic washout since the tip will twist according to the pressure on it, pushing out in a tight turn, springing back in normal flight. To some extent this method can help moderate speed fluctuations too since mid window where the wind is strongest the tips will tend to deflect back under the force of the wind creating some drag.
- An often overlooked method is simply to use a main stand-off which is more springy than usual. It is quite common on lightweight kites to use a stand-off which is only 2mm dia. and which is quite bowed. The effect of this is that it can be compressed allowing more billow to develop out toward the wing tip.
- Finally, using tapered spars will allow the lower leading edge to deflect inward, allowing a little extra billow in that area. As the tip bends the sail is twisting outward giving some washout.
Billow
Sail depth, billow or close up angle all loosely mean the same thing, the depth of the channel formed by the stand-off. Strictly speaking close-up angle is the difference in nose angle between the sail laid flat and when the kite is built up so if there are more than one stand-off per side you need a greater close up for the same depth but for now that's being a little pedantic. Close-up angles are typically between 10 and 20 degrees.
As with everything there are trade-offs to be made
A kite with a large billow will typically
- load the frame less
- fly slower - more drag
- be more stable and precise
- offer improved recovery in tricks
A kite with less billow will typically
- Have a noticeably wider window
- fly faster
- offer more drive
- offer better side slides
- luff more readily in a tight turn due to less wash-out.
It does seem that a large billow offers all the advantages and indeed billows are typically larger on modern kites, however the chief problem is the width of the wind window. A large window is important in kites designed for team or precision flying so that genre typically has a flatter sail.
Balance
In a side slide or slack line move such as a 540 flat-spin, the kites balance begins to show. The kite may complete the move smoothly or the tail may hang a little low in a flat-spin so you need extra slack to avoid snagging your lines, or twitch about making a stall or slide difficult to hold. There are primarily 2 elements of balance think about, static and dynamic.
Static Balance
This is a simple distribution of weight. A little extra weight toward the nose will help provide a little extra inertia to help with Flic-Flacs, a little extra weight toward the tail will help a kite hold a Side-Slide. Changes to static balance often occur when changing from heavy pultruded spars to a lightweight wrapped frame. Given that the lower spreaders are much longer than the upper, there's quite a bit more carbon low in the kite. So, when changing to a lighter frame the greatest saving in weight will be in the bottom half of the kite (just in case you doubt that last statement, here is a worked example).
I have experimented with a nicely balanced commercial kite where I tried frames both heavier and lighter than standard. With the heavier frame the kite held stalls well and performed nice slides. This is what I would expect since the kite became comparatively bottom heavy. With an ultra-light frame the kite was slightly less stable in a stall or slide but much easier to Flic-Flac. Most of the weight saved was in the lower half so the kite was now comparatively top heavy.
Static balance has far less effect on the way a kite performs in the pancaked position. I have experimented with pieces of lead tape attached to kites and you might be surprised at how little difference weight makes in a flat-spin. In this kind of position dynamic or 'flat' balance tends to swamp any static imbalance. Note that I'm taliking of maybe 5g to level out a flatspin here not the common practice of adding 30~40g to help with yo-yos.
Dynamic balance
When a kite is falling in the belly down position, usually in low wind maybe in a move such as a flat-spin, you might notice the kite is reluctant to flatten or the tail may hang a little low. This is a manifestation of the kite's dynamic balance.
By dynamic balance I'm not referring so much to weight as the sum of the effects of static balance and the relationship between areas of the sail which create air resistance as the kite falls. Usually, the effects the relationship between areas of the sail are dominant and swamp the effects of static balance.
An analogy: Imagine you have a stick, held exactly in the centre with identical 12" dai. card discs attached to each end. If you move it through the air it should stay pretty balanced. Now reduce one of the discs to 6" dia. And as you move the stick through the air, the end with the larger disc will lag behind. This is the kind of think I mean here.
A normal stunt kite is symmetrical to either side of the spine and is therefore balanced in that direction. To balance the kite in the nose to tail direction some balance point must be identified on the spine such the sail area can be balanced above and below that point.
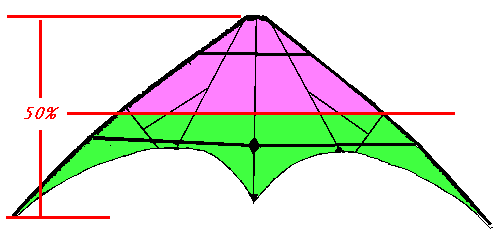
So, referring to the sketch above, the green and purple portions need to be of equal area. But just to confuse things further it's not actual cloth area that should be balanced but the image projected onto a flat surface that needs to be balanced i.e. the silhouette. Imagine a sheet of card, flat it has a lot of air resistance, edge on it has little, event though the area of the card is unchanged. This is analogous to what is happening here. This can be illustrated by the simple exercise of adding some extra stand-offs out toward the tips. If you push the sail out near the tips the cloth area stays the same but the area of the silhouette decreases. In real life pushing the tips out reduces the apparent area of the bottom half of the silhouette as the kite falls flat so the kite becomes more tail heavy even though it's actual sail area hasn't decreased.
Balance Generally
I don't pay much attention to static balance in the early stages of a design. If I'm using the same carbon throughout and off the shelf fittings, the static balance tends to near enough take care of itself if you keep the spreaders around 20% from the spine ends. The centre of gravity of a delta stunt-kite is usually somewhere just above the T, but it can be pushed toward the nose to help the kite glide better making it easier to glide the kite away from you thus gaining ground in light wind.
I do pay a lot of attention to dynamic balance. I like my kites to axle flat so that I don't snag lines, and don't need a trick line. I also like kites to have a little dwell in the flat position since that makes multiple flat-spins and axles simpler. I also like to be able to glide kites away from me in light wind to gain ground, too little area in the bottom half of the sail and the kite stalls in a 'fly away'.
I used to use CAD to measure the relevant areas but it can be done on paper or just by watching a kite's behaviour in flight. If the tail tends to hang down during a flat-spin or flares out when you try to gain ground, you probably could use a little more sail in the bottom half of the kite. On the other hand if you really cannot flare the kite out even in the lowest winds and the kite tends to flat-spin tail high you could probably use a little less sail in the bottom half.
Wide or narrow nose
Both work and are in widespread use on successful designs, there is no right way just a matter of personal choice.
A tight nose typically gives great frame integrity. With no scope for movement the frame forms a nice rigid triangle. Without additional measures to create it less billow forms just inside the leading edge so the kite will often feel lighter on the lines. In my opinion kites with tight noses are often more twitchy when you try to hold a long stall. A tight narrow nose also helps reduce pitch stability making moves like yo-yos easier.
A wide nose produces a (distorted) H shaped frame. This allows considerable movement back and forth in the plane of the frame. Taken to extreme this can feel a little alien however the momentary distortion can give fantastic snap stalls and punch turns and stable stalls and slides. In normal flight a very wide nose will form a channel in the centre of the kite which can improve tracking and as the upper leading edge squeezes in extra billow will develop just inside the upper leading edge which can enhance tracking, and a solid feel in low wind.
Typically tight noses suit responsive radical and trick kites. Wide noses suit large wings, often precision kites and all rounders.
Sail tesnion - Flat and tight or deforms to an aerofoil
Some designers seem greatly concerned with sails that assume the shape of an aerofoil in flight. This is usually realised as a fair amount of camber in the sail with the deepest area near to the leading edge and can be achieved by various means:
- The sail can be cut in such a way that the ripstop in the area behind the leading edge lies with the bias parallel to the spar allowing more billow to develop here as the sail stretches
- A sail can be made from multiple panels assembled in such a way that the sail is 3 dimensional.
- The sail can be battened.
- By pleating putting darts (in the dressmaking sense) in the sail cloth on the leading edge
All have their merits but perhaps the first is potentially the most elegant and least noticed, especially in it's simplest form.
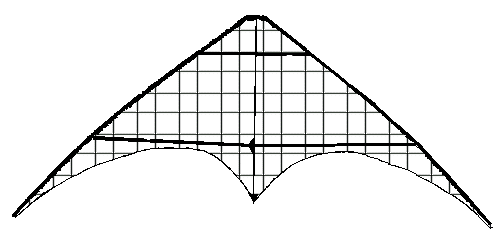
It is quite common for kites to be laid out with the warp and fill of the fabric parallel to the spreaders and spine of the kite, i.e. the direction of least stretch on the fabric (along the roll) aligned with the greatest forces on the sail (across the sail). If you look at the sketch above you'll see that with the sail laid out this way, the fabric behind the leading edge has the bias parallel to the spar. As a result some stretch occurs here, so that extra billow helps create that aerofoil shape.
Battens are effective but heavy and increase the complexity of the kite. They have appeared in a few very interesting ultra high aspect designs which echo some design elements found hang gliders
Assembling a sail from multiple panels in a 3D shape can be complex and time consuming, for production kites this usually increases the price.
Darts in the sail cloth on the leading edge can be very effective however the kite does need to get moving to assume the correct shape. I've only seen two manufacturers use this technique, probably due to complexity in production however the results can be very good.
Whether or not it's a good idea for a sail to take on the shape of an aerofoil in flight depends on your style of flying. Certainly if traction is your objective it is a good thing, the right aerofoil will produce far more pull than a conventional sail of the same shape and size. Few people however use delta wing framed stunt kites for traction. That is now pretty much the domain of large foils. For precision and old school team flying, some pull is desirable and linear flight is the dominant mode, so again the aerofoil approach can be good. As soon as you consider stalling the kite, then I feel that the aerofoil loses it's advantage so for modern team, freestyle and trick flying a flat sail is the way to go, or at the very most use sail layup techniques. Where a sail forms an aerofoil in forward flight, the transition to stall will be very dramatic as the aerofoil collapses. The kite may be unstable while held in a stall and certainly the aerofoil will contribute little while the kite performs slack line moves. Recovery from slack line moves may suffer too, the kite will need to get moving to assume the proper shape and for the aerofoil to become effective again.
As always there are exceptions to this and some very fine kites have been designed which utilise these techniques. It is easier to design a flat sail as a base line and then experiment with some 3D techniques to see if you can benefit.
For good low wind performance and a predictable progression as the wind drops, my preference is a taut, flat, low porosity sail with a sizeable keel to act as a nice barn door to pull against.
Straight or curved LE
Many reasons are espoused for the use of a heavily cambered leading edge most of them are spurious. Leading edges are curved primarily to tension the sail and the frame, and because curved leading edges are fashionable.
A small amount of curvature below the lower spreader will keep the trailing edge and wingtip areas taut, which can help reduce noise and potentially improving low wind performance too.
Using a little curvature and a tight cord to fasten the tips to the nock can also preload the leading edge spars which can yield a stiffer feel from a lighter frame.
With regard to ground work there are pro's and cons as usual. Cartwheels or ground rolls are probably easier with an extreme camber, although you may be more likely to break a pre-stressed leading edge. Leading edge drags, may or may not benefit. On one hand, with a curved leading edge there is less area in contact with the ground, on the other the weight of the whole kite is acting on that small contact patch so it more likely to find some grip against the ground. I have found it easier to slide on a straighter leading edge though less easy to turn up into a leading edge takeoff.
By slightly mismatching the curve of the sail with the curvature of the leading edge spar a baggy patch can be produced just behind the leading edge if you are trying to emulate an aerofoil, however there are more predictable ways to do this.With an extreme curvature, the dynamic balance of the kite in the pancaked position will be adversely effected. Typically as the leading edge becomes more curved you increase sail area in the top half of the sail and decrease it in the lower half. This often leads to a design which is 'tail heavy' in flat-spins and axles so approach heavy camber with some caution if you intend to do a lot of slack line moves.
While there are many succesful designs with leading edges which curve all the way to the nose webbing I'd advise a more conservative approach to begin with, keep the curve confined to the area around th lower spreaders and below. With a stiff frame it can be difficult to get the top half of the leading edge to assume the proper shape, this can lead to a baggy patch just inside the leading edge. Some kite makers have attempted to address this by using a longer upper spreader to push the frame out, while this can work I've also seen a few commerciall kites where the overlength top spreader deforms the shape of the back of the sail. This can have detrimental effects on pitch tricks although it can sometimes make axels spin faster mainly because the sail gets flattened behind the spreader as the sail is deformed - more on this later.
Trailing Edge Shapes
The most noticeable facet of trailing edge shape is noise. A slack, straight edge can rival a road drill in 5mph, a taut elliptical curve can remain silent in strong wind. Typically a quarter ellipse or chain curve, in conjunction with a leech line is used to keep a trailing edge taut and quiet. For some team kites however the trailing edge is intentionally left slack. A loud roar that stops and starts abruptly with each punch turn or snap stall can add great dramatic effect to a routine. Furthermore it can help regulate speed, since the wing becomes less efficient as it vibrates; as the kite gathers speed the vibration starts and the kite is slowed.
The other significant effect is upon the turn rate. If the trailing edge is relatively straight across, the centre of area of each wing will be further away from the spine, with a heavily cut away trailing edge the centre of area moves closer to the spine. The closer the centre of area is to the spine the tighter the kite will turn. This is evidenced on newer radical kites, which almost always have deeply cut away trailing edges and perform great spins.
Even if you like a noisy kite it may still be worthwhile installing a leech line, just one without much tension so the kite is still noisy - it can offer some useful support to protect the sail in a yo-yo.
A trailing edge cut quite low will cause the nose to hang lower than the tail in the turtle position which really helps with French style multi-lazies. It also helps the kite to lose less height in turtles and lazies since with the nose low, the back of the sail is presented to the wind at an angle which presumably generates a little lift, enough to slow down the fall anyway.
Standoff Position
As usual standoff position is all about compromise. Here are the two ends of the scale and the results you can expect if you go in that direction including effects on a few popular tricks:
| Position | In, close to spine | Out, nearer wing tip |
| Wind range |
Wider, especially at the top end
Can feel a bit gutless across the wind range |
Narrower wind range
Feels more 'powered up' In very low wind the kite has more drive when pumped (which seems to come from the keel) |
| Cornering |
Needs punching through corners
Can stall in tight pull turns, especially on a light bridle |
Smooth cornering, often with smaller hand movements
Turns tight without stalling Turn rate stays good with a lighter bridle |
| Window | Wider | Narrower but effect can be mitigated by measures such as a heavier bridle setting |
| Precision | Good provided you drive the kite everywhere | Straight lines more prone to wander, needs a steady hand |
| Snap Stall | Limp, may not want to stay stalled | Crisp, stalls deep and stays stalled |
| Turtle |
Locks in quick
Less stable, prone to roll around the axis of the spine |
Slower to lock in
More stable, less sensitive to input |
| Lazy Susan |
Finger near the middle of a record feel
Sensitive, spins faster for a small input Multi-lazies lock in and whip around quickly Less stable |
Finger out near edge of record feel
Needs larger inputs to rotate More stable |
| Backspin |
Needs no finesse, fade then smack it!
Multiples can degenerate into barrel rolls |
Needs more finesse to set up and initiate
Stays flatter |
| Roll-up |
Rolls up slower
Less lateral stability, rolling side to side around spine Can be more difficult to initiate a two pop roll-up due to wandering |
Rolls up quicker
More stable, doesn't roll around |
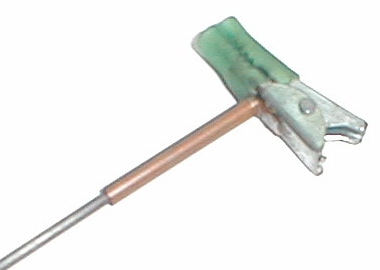
The best way to work out the position is to start with a rough idea where you want them and then try them a little to either side noting the effect. For adjusting the standoff position on a prototype, I often use a couple of crocodile clips with a bit of 3mm brass tube soldered onto them and some rubber tube over the jaws. Using these I can move the standoffs around without the need to make extra holes in the sail. Alternatively, sew a strip of dacron on to the sail with a row of holes so you can move the standoffs around.
Backspins, a Brief Digression
Standoff position has a great effect on a kites ability to backspin. The kite will backspin more easily for smaller angles A in the following diagram:

As you move the outer standoff outward to improve your kites turning ability and pitch performance you will reach a limit, past which the kite will no longer backspin. This limit can be extended by setting the bridle towpoints lower and wider and by adding ballast to the tail.
Another way to help extend this limit is to use tapered spreaders. Because a tapered spar bends toward the tip, the angle of the outer panel will stay shallower(B) than it would with a straight spar (A) if the standoffs are moved outward, keeping the kite backspinnable (because the kite is flatter it may make rotational moves faster too). In a nutshell, using a tapered lower spreader can help you get a better backspin/rollup/turn compromise if youre struggling to get the feel you are looking for.

Pairs of Standoffs
A number of French and French influenced kites come with two stand-offs per side. The guidelines above still apply but there are some subtle extras on this style of kite which should be mentioned.
The standoff furthest from the spine controls the kites turn rate and backspin ability as described above. You will want to move the outer standoff out as far as you can while still being able to backspin in order to get a good turn without the kite luffing.
The standoff closest to the spine is positioned to get a good compromise between pitch performance and rotational moves. As you move it away from the spine, closer to the other standoff, the kite will be easier to yo-yo BUT the tail will hang low in rotational moves such as axels and flat spins. As you move it closer to the spine, axels and 540s will be flatter but yo-yos will be slower.
It is common to see some kites with two stand-offs very close to each other. This is because if you move the inner standoff too close to the outer (eventually you would do away with it all together, i.e. you move it to the same postition as the outer) the effect of the tail hanging low due to tail balast becomes too great and the kite becomes almost unflyable.
Some people have questioned why French style kites often have two standoffs close together. Some French kites started with two widely spaced standoffs in the late 1990s, to gain good pitch performance before the introduction of weights (kites like that flic-flac very well). My guess is that as tail ballast became more popular and tricks focused on yo-yos, designers probably moved the inner standoff outward to improve roll-ups eventually finding a limit to how far they could go before the ballast made the kite unable to perform rotational moves. Thats where they stopped. This would have been an evolutionary progression building on designers previous designs. It is often argued that two standoffs could simply be replaced by one longer standoff between the locations of the two to achieve the same sail angles. True but the downside to this would be that the sail would stick out even further at the back, slowing rotational moves even more on a design style that might already be having problems performing clean rotational moves. Just my thoughts...
A Handy Analogy
I've likened the feel of stand-off positions to moving a record on a turntable in the section about lazy susans in the table above so this seems a good place to describe an analogy which helps to describe the way stand-off positions, bridle positions etc. influence the feel of a kite. Feel is a very subjective thing and difficult to describe but this is the best I've come across so far so thanks to whoever it was who described it to me this way.
Imagine a record on a turntable:
- If you place your finger out near the edge, it is easy to turn but for a fixed distance travelled by the finger the angle rotated by the record is fairly small, it is also easy to accurately control how far you rotate it. The motion will however feel gentle and less snappy and a rotation takes comparatively larger hand movements.
- If you place your finger near the centre, it takes more effort to initiate the turn but for the same fixed distance travelled by the finger the angle rotated by the record will be much larger, it is however more difficult to control the rotation accurately. The motion will feel positive and snappy and a rotation takes comparartively smaller but more accurately controlled hand movements
This is a useful way to convey feel and can be applied to lots of areas of kite design.
Upper Spreaders
It has become common practice to shorten top spreaders, this reduces the projected area of the top half of the sail helping with pitch tricks and it can create a little billow just inside the leading edge which seems to help with precision.
During the nineties however it was not uncommon to see overlength top spreaders. With a neutral length top spreader the sail forms a line from the end of the standoff to the nose. As the length of the spreader increases the sail deforms inward toward the plane of the frame. This can make axles a little more spinny by reducing how far the back of the sail projects out into the airstream as the kite rotates however it has some negative effects: The kite will become more difficult to yo-yo due to more apparent area in the top half of the sail, fades feel odd, and as the kite is flying normally you will feel a change in the kite as the sail pushes out to its correct state in stronger winds.
Ballast
If you have ever tricked an SUL you will know the advantages of inertia you get with a normal weight kite. Similarly weight can be added so that the inertia from it can help with certain tricks.Typically weight is added to the tail or nose to help enhace pitch tricks, or to the spreader ends to enhance rotational tricks. Weights of between 15g and 30g are fairly common.
To take full advantage of extra ballast it may be neccesary to modify the design of your sail. If you add ballast, particularly to a kite that wasn't designed with it in mind you may find that you gain yo-yos at the expense of Jacob's ladders for example. Typically, to take full advantage of tail ballast sometimes the sail has more billow, although this has disadvantegs mentioned earlieer or the trailing edge will be cut lower (increasing the chord) which will have a similar positive effects and adds a little to the projected area in the bottom half of the kite to help compensate for the effects of the added weight in rotational moves.
Yo-yo Stoppers
The general rule of thumb is that Yo-yo stoppers go 2/5 (or 40%) of the leading edge length down from the nose.
Personally I experiment with cable ties to get the position about right before making big holes for yo-yo stoppers
Tuning for Cometes
I cant guarantee this will work for all pilots on all kites but this works for me
I often fly with up to 30g all on the tail end of the spine, this makes cometes difficult to make them easier:
- Reduce the weight, I think my 'comete weight' is about 18g.
- On kites with pairs of standoffs move the inner standoffs outwards.
Moving the inner standoffs out makes yo-yos easier which will help compensate for them getting slower with less weight. Moving the inner standoffs out also makes the turtle less deep and locked in; this helps because pulling the kite out of the almost turtle, the 4th phase of the comete, can be quite difficult with a kite that really locks in to a turtle.
As ever adjust a little either way on the standoffs to be sure you find the compromise that works for you. You'll be trading off solid turtles and multilazies against easier cometes.
kitedesign/design.html last modified 19:57:09 30-Jul-2017

This work is licensed under a Creative Commons Attribution-NonCommercial-ShareAlike 2.0 England & Wales License.