Bridling
|
|
|
| Menu |
|
Home
About News Kites Kite Design - Why They Fly - Design - From Scratch - Bridling - Hints-n-Tips - Weird Ideas Kite Making Contributed Skateboards To-do Links |
This will not be an exhaustive treatise on bridle design but I hope it will give you enough of a clue to get your new design in the air and enough pointers to get you on the way to tuning your bridle to get somewhere near the feel you want to achieve.
I will discuss two basic bridles, the 3 point static bridle and the turbo bridle, these should be sufficient to get you going and I will leave description of more esoteric bridles to the people who invented them. If for no other reason, static and turbo bridles seem to particularly suit the current crop of French Style kites which seem to be popular at the time of writing.
Introduction
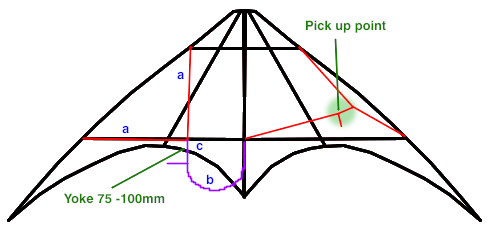
I will start with a diagram showing a turbo bridle on the left and a static bridle on the right naming the parts of each bridle. Some people seem to use different names for bridle components. These are what I know each leg as, if you think my terminology is incorrect please email me and let me know what you think they should be called!
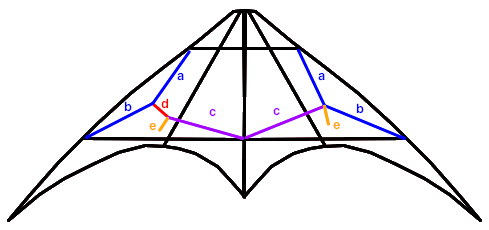
- The bridle legs shown in blue (a and b) are known as the outhauls. On British kites at least, the upper outhaul(a) and the lower outhaul(b) are typically one continous piece of bridle cord larksheaded onto either the end of the inhaul(c) or the turbo bridle yoke(d).
- The bridle legs shown in purple are known as the inhauls(c). Again, on British kites, the inhauls(c) are typically one continuous piece of bridle cord with a stopper knot at the ends and the centre is larksheaded around the spine at the t-piece. A locked larkshead is usually used here.
- The short red leg(d) on a turbo bridle is known as the yoke(d). It is actually not a seperate piece of cord, it is simply the end of the inhaul(c) past the point where the pigtails(e) are prussik knotted on to the inhaul.
- Finally the part you attach your flying lines to is known as a pigtail(e). It is also known as a towpoint, pickup point or any of several other names. Typically the pigtails are short loops prussik knotted onto the inhaul of a turbo bridle or on a static bridle the end of the inhaul is attached with a sheet bend.
Point of Influence and Feel
If you sight down the flying lines, you can mentally project the end of the lines to a point where they would intersect with the sail. This is known as the Point of Influence (POI) of the bridle. Typically on a conventional stunt kite the POI falls somewhere in the centre of the outer panel of the kite (the panel between standoff, wingtip and nose). This is roughly the area shown as in green on the following diagram.
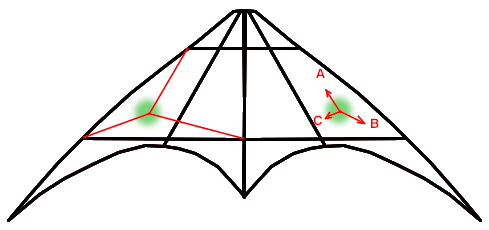
There is a sweet spot somewhere roughly in the centre of that outer panel, roughly in the middle of that green blob. As your POI moves away from that sweet spot the feel of the kite will change. Feel is very difficult to describe but one of the best analogies I have heard compares the feel of a bridle to the feel of moving a record on a turntable with your finger.
Imagine a record on a turntable:
- If you place your finger out near the edge, it is easy to turn but for a fixed distance travelled by the finger the angle rotated by the record is fairly small, it is also easy to accurately control how far you rotate it. The motion will however feel gentle and less snappy and a rotation takes comparatively larger hand movements.
- If you place your finger near the centre, it takes more effort to initiate the turn but for the same fixed distance travelled by the finger the angle rotated by the record will be much larger, it is however more difficult to control the rotation accurately. The motion will feel positive and snappy and a rotation takes comparartively smaller but more accurately controlled hand movements
On a kite, where the POI falls outside the sweetspot, closer to the leading edgeyou will get the feel described in the first case: Hand movements will be larger, turns will be easy to start but it will not feel as sharp. On a kite where the POI falls closer to the spine than the sweetspot you will get the feel described in the second case: Small punchy hand movements, sensitive and sharp feeling, some initial reluctance to turn followed by a tight turn for comparatively little hand movements.
Comparing this with popular styles of kites there are three predominant styles of bridling which are popular. Looking at the diagram above, the POI falls roughly in directions A, B or C.
- Beginner kites often have a POI roughly somewhere along line A, this gives steering somewhere in the middle but sets the bridle fairly light making takeoff easier, flight is generally fast and the kite can shed some wind when flown in a gale by a kid on a beach.
- Current French Style kites usually have their POI somewhere along line B. This sets the bridle pretty heavy for good pitch based tricks (more on pitch later), sets the bridle wide which helps backspins but since this is analogous to having your finger well out on the turntable, hand movements can be very large and rotational moves such as axels and 540's can be sluggish compared to trick kites from the late 1990s.
- Late 1990s British trick kites typically had a POI somewhere along line C, not much good for backspins but the short inhaul was like having your finger closer to the spindle on the turntable, rotational tricks like axels or the 540 were very snappy and turns crisp verging on oversteer.
Armed with the generalisations above it should be possible to take one of the rule of thumb bridles described below and adjust it roughly in one of directions A,B or C to start working toward the kind of feel you are looking for
Knots
Before going on to describe a few rules of thumb to get your prototype in the air for the first time, it will be useful to show the knots used in the descriptions below.
OK... so whats going to go here - I took a bucnh of photos and they were rubbish, then I forgot about it for ages and took some more and theyre not much better but the plan is to show each knot done first with thin rope so the knots are easier to see, then with contrasting colour bridle cord so you can see how they look on a bridle. Trouble is I can't get the hang of close up photography so bear with me.
| Knots Used in Bridling | ||
|---|---|---|
| images open in a new window | Knotted Rope | Bridle Cord |
|
Larkshead
Used for attaching outhauls to in-hauls |
|
|
|
Locked larkshead
I use this for attaching the inhauls to the spine at the T |
|
|
|
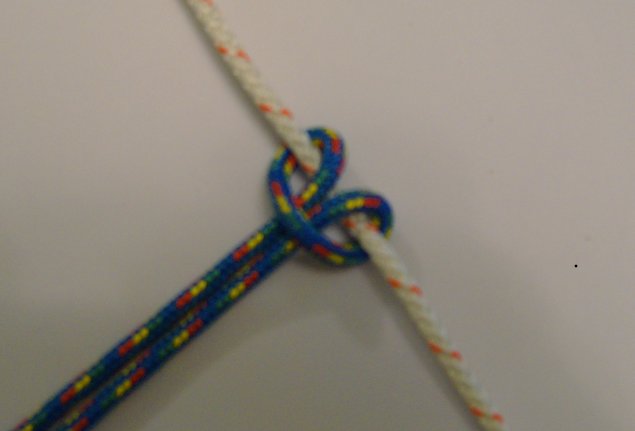
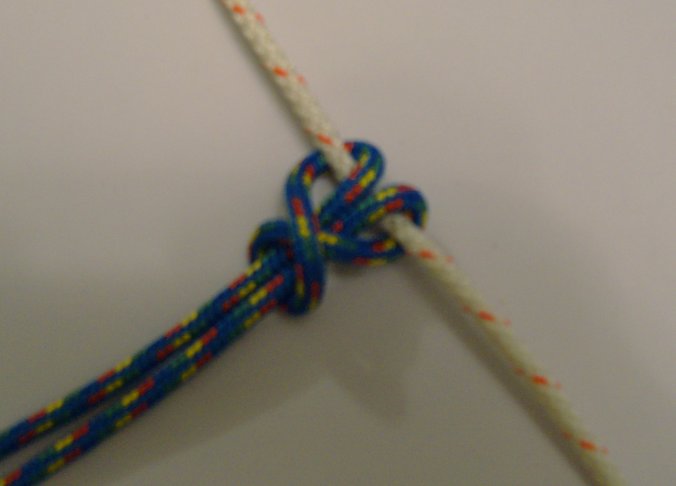
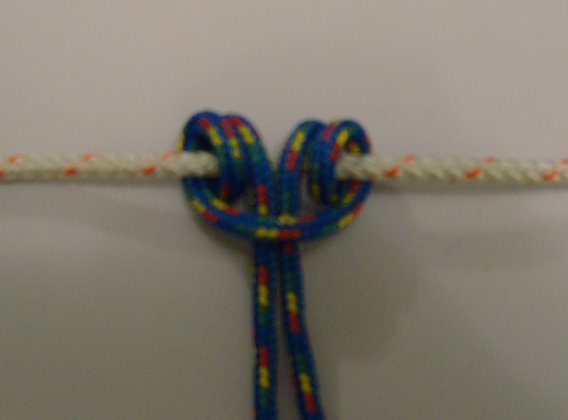
Prussik
Good for fixing pigtails to inhauls on turbo bridles |
|
|
|
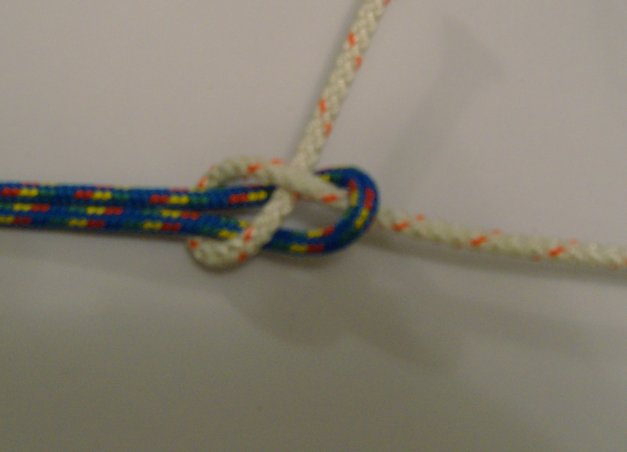
Sheet bend
Good for activators and ends of inhauls |
|
|
|
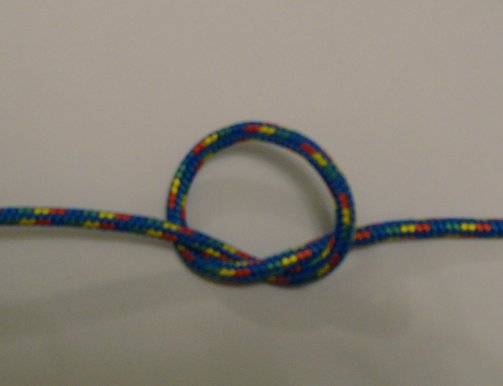
Overhand knot
Used for stopper knots or use several at the end of an in-haul for an adjustable sheet bend |
|
|
|
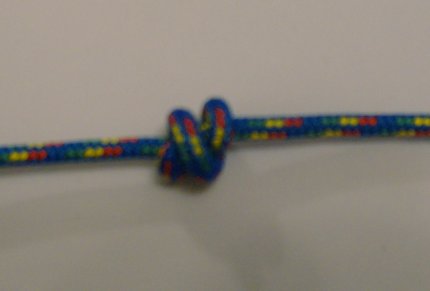
Double overhand knot
Good for making loops for pigtails and line-ends |
|
|
|
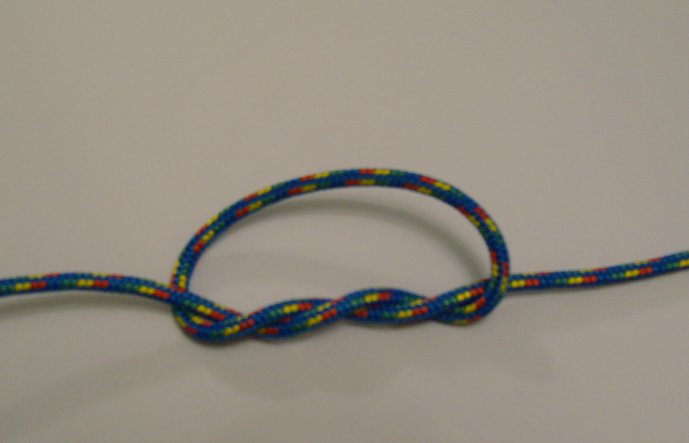
Double overhand knot cinched up
good for stoppers, doesn't weaken the cord as much a single |
|
|
|
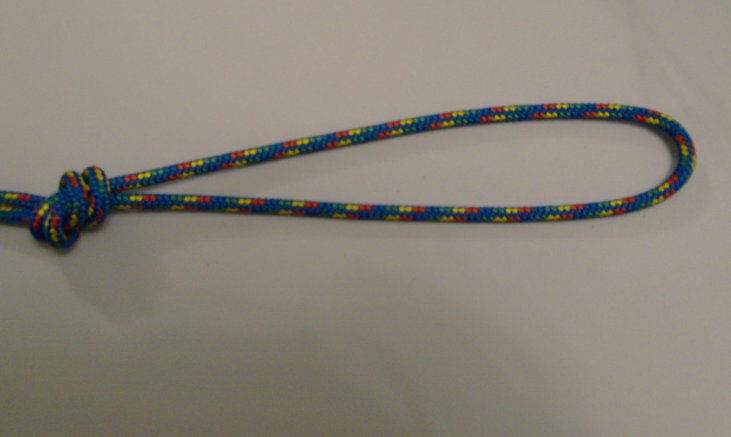
Pigtail with overhand knot
Meeting point of a bridle used for line attachment |
|
|
|
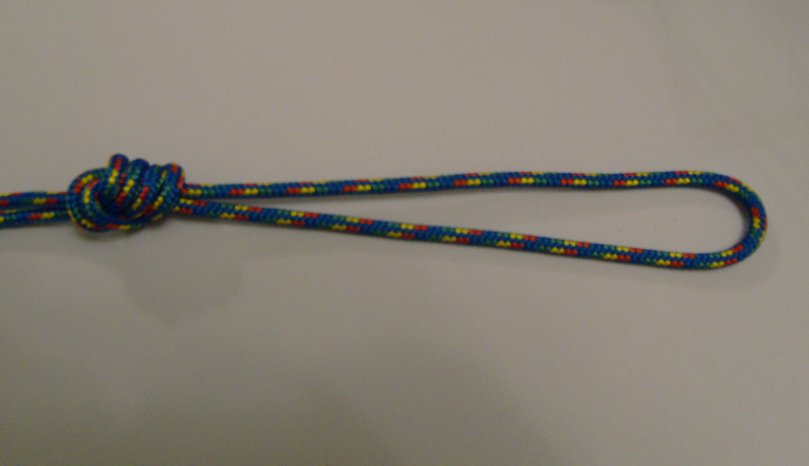
Pigtail with double overhand knot
Meeting point of a bridle used for line attachment |
|
|
|
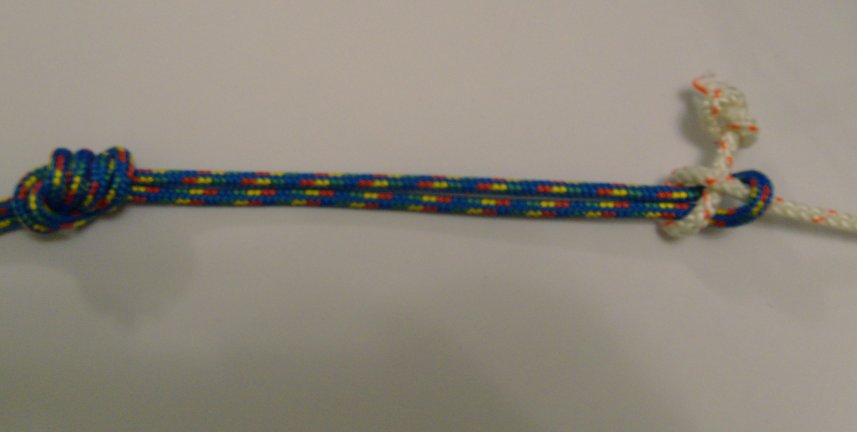
Inhaul attached to pigtail with sheet bend
becomes the point where all the bridle legs meet |
|
|
|
outhauls larksheaded onto inhaul
another way to bring all the legs together |
|
|
|
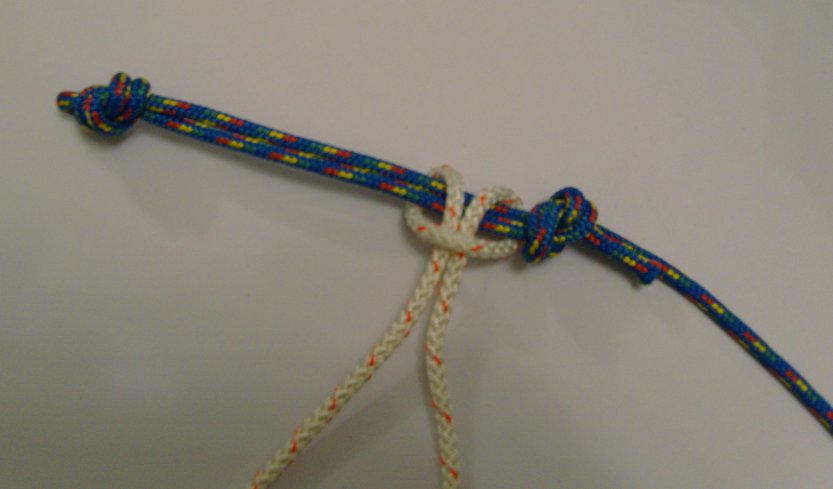
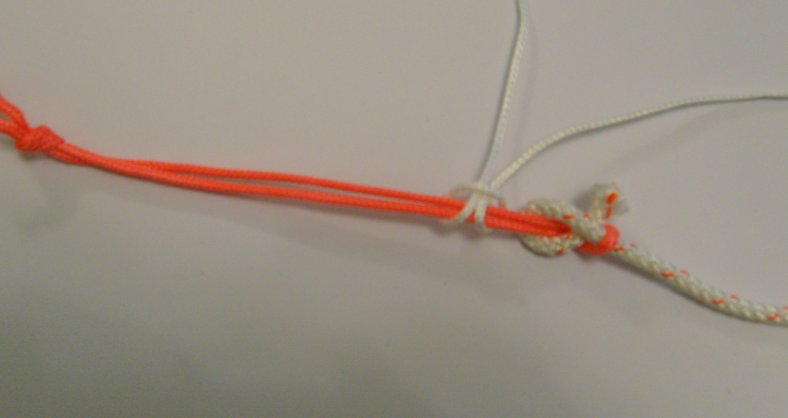
A common way to assemble a 3 point bridle
white=outhauls, white/orange=inhaul, pink=pigtail |
|
Rule of Thumb Turbo Bridle
This is usually the first bridle I try with a prototype and while it is no wonder-bridle it will almost always fly first time. Then it is just a case of adjusting it and possibly lengthening all the legs a little since it is quite a short bridle.
First of all I make the outhauls(a) from one continuous piece of cord, making the length such that it forms a right angle from top spreader connector to bottom spreader connector as shown in red. I mark the apex of that right angle, that is where I will larkshead onto the inhaul. This point always seems to give me an angle of attack that will not only fly but is not a million miles away from what will turn out to be the optimum.
Next I do both inhauls as one continuous piece of cord, locked-larksheading the centre around the spine, I leave the ends un-knotted to begin with.
I make a couple of pigtails and loosely prussik knot them onto the inhauls, leaving them unlocked so that I can slide them up and down.
Now I larkshead the outhauls onto the yoke end of the inhaul temporarily and by eye adjust the length of the inhaul and pigtail position to give me a yoke(c) length of 75-100mm and to position the pigtail by eye roughly over the centre of that outer panel (see right of diagram), guessing where that sweet spot will be.
Finally I tie a few stopper knots every 20mm either side of the point where the outhauls meet the inhaul. Then I larkshead the outhauls behind one of these, the extra knots allowing me to adjust in and out.
Then I go for a fly to test it...
Rule of Thumb Static Bridle
Alternatively, if I want something bridle wide and low like a French kite I usually start with a static bridle. The basic principle of that 90degree angle between the spreader connectors is still used to find your starting point but you just need to add a little extra...
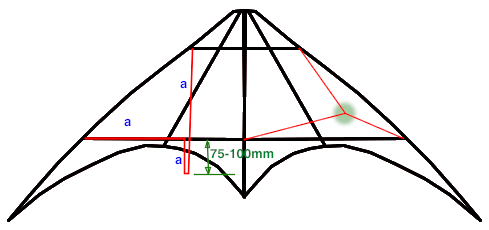
First of all I make the outhauls(a) from one continuous piece of cord, making the length such that it forms a right angle from top spreader connector to bottom spreader connector PLUS an extra 75-100mm - this is what would have been the yoke if it was going to be a turbo bridle. Again this is shown in red. I mark the end of that extra loop, where I will larkshead onto the inhaul.
Next I do both inhauls as one continuous piece of cord, locked-larksheading the centre around the spine, I leave the ends un-knotted to begin with.
I make a couple of pigtails, the inhauls will attach to these with a sheetbend.
Now I measure the inhauls and mark the point which, by eye, seems to put the pigtail over the the center of the outer panel and again I tie a few stopper knots every 20mm either side of that point.
Now I attach the inhaul to the loop end of the pigtail with a sheet bend, using different stopper knots allows me to adjust the length of the inhaul to make position the pigtail around that sweetspot. Then the outhauls larkshead over the pigtail against that sheet bend.
Then I go for a fly to test it...
Tuning
In low wind:
- nose forward will reduce the pull you feel but the kite will fly faster which helps it to stay aloft without working it. Good if you just want to stand still and let the kite fly itself. You can only go so far before the kite feels gutless and vague though.
- nose back makes the kite slower but harder pulling giving you something to tug against if you'r going to fly the kite actively by pumping the lines and moving around.
In high wind:
- nose forward can help reduce pull and stress on the frame, but a faster kite can start to generate extra pull due to so called 'apparent' wind due to its speed across the sail. It also reduces the window somewhat.
- nose back it pulls hard but it more importantly it reduces the speed, so less apparent wind meaning there is a limit to the pull. With less speed things tend to be easier to control (if you can live with the pull). Your window is a bit wider too.
Personally I prefer nose back as far as I can get away with - I move around a lot so I find it easier to work a kite in low wind but my kite wouldn't stay in the air without being worked. In high wind I don't mind the pull so long as I keep the speed down giving me more control.
As ever play around and see what works for you.
Bridle Effects in Slack Line Moves
Most tricks involve some sort of stall whether as the precursor to an axel, in a hard tip stap or getting the nose rocking to roll the kite up.
In general a heavier (i.e. nose back) bridle will make stalling easier so heavier bridles tend to be favoured for slack line trick flying. Currently Frenc style low and wide bridles have become the norm for almst everything and it has to be said they are versatile and have a lot of advantages.
Thats not the whole story though, heres a few examples:
- backspins are easier with the towpoints low and wide.
- low and wide is good for roll-ups and other pitch tricks
- a light nose forward bridle makes flic-flacs (fade/flare) easier
- a narrower bridle will help speed up spin tricks like axels and 540s
- narrow and heavy is nice for really aggressive stabs and black holes
Bridle Effects on Pitch Tricks
Back to that turntable analogy again... Just as the turntable analogy works for a kite turning left and right about it's centre T-Piece it also works for a kite pitching, i.e. rotating approximately about its lower spreaders.
If the pigtails are closer to the spreaders, i.e. the axis of rotation then pitch moves are a lot snappier and need shorter inputs just like having your finger closer to the spindle on a turntable. In order to keep the kite flyable, the towpoints also need to move out as they move lower, this is the essence of many French style bridles. A low, wide set bridle not only improves a kites pitch performance it also makes it easier (in most cases) to backspin.
This would appear to be a win-win situation however as the pigtails move down and out you also move them away from the axis of rotational moves to turns, axels and flatspins will become more sluggish. The great challenge lies in finding the best compromise between the two. In some cases this can be addressed by using something like a Cross Active Bridle which will shorten the inhauls and upper outhauls slightly in linear flight.
kitedesign/bridling.html last modified 19:57:09 30-Jul-2017

This work is licensed under a Creative Commons Attribution-NonCommercial-ShareAlike 2.0 England & Wales License.