Thornback
|
|
|
| Menu |
|
Home
About News Kites Kite Design Kite Making - Construction - Plans - Acara - Ram - Manta - Stingray - Thornback - Gallery Contributed Skateboards To-do Links |
CAVEAT EMPTOR - READ BEFORE BUILDING
Before you rush out to invest a small fortune in ripstop and carbon you should be aware of this designs idiosyncrasies just in case you might not like it.
I fly kites this size mostly in winds less than 10mph so above that it's not going to be as much fun. While it will fly in 15mph and still axel, lazy susan etc. roll-up tricks will need a lot more work. So, if you live somewhere where the wind is constantly 15mph or more this is probably not the kite for you.
I wanted to build an all-rounder that could still do a flat 540 as well as roll up so I have not sacrificed everything else to get a super fast yo-yo. Roll-ups are slow compared to some kites and you will need to run into it to give it slack, you dont just whack it out of a barrel roll and it does it all for free. Also compared to smaller late nineties British style kites, this kite needs larger inputs but no more than other kites of this style. If you want something that you fly with your wrists and that rolls up quicker you might prefer to try the smaller Stingray.
None of this is meant to suggest this is a bad kite, I just don't want to mislead anyone.
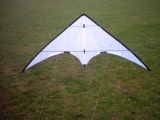
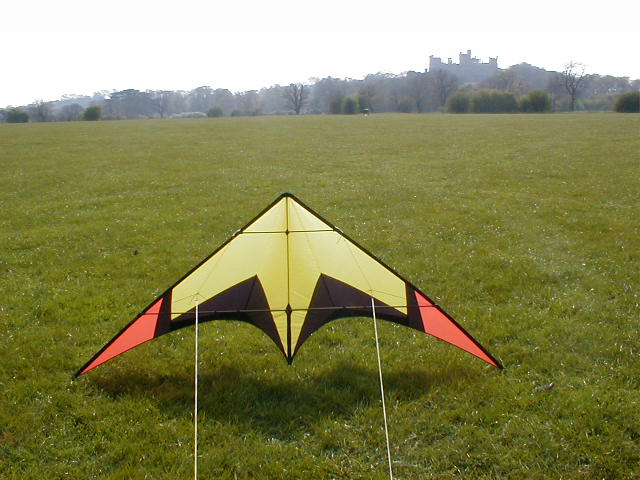
Thornback Mk2
These are the plans for the second version which is much better. See the design from scratch page for commentary.
Video clip of a Thornback built by Rob Paliotta and flown by Pierro Serra (12.5Mb wmv). Cheers guys!
Hans Raue (FlyingWolf) has created a great set of pages detailing construction of his Thornback. Well worth a read before starting to build your own.
Thanks Hans!
Erik Recke (datenland) has created the following plans from my scanned bits of graph paper. They are available in pdf, dxf and Vectorworks file formats.
Thanks Erik!
Thornback 2nd prototype, Vectorworks format
Thornback 2nd prototype, DXF format
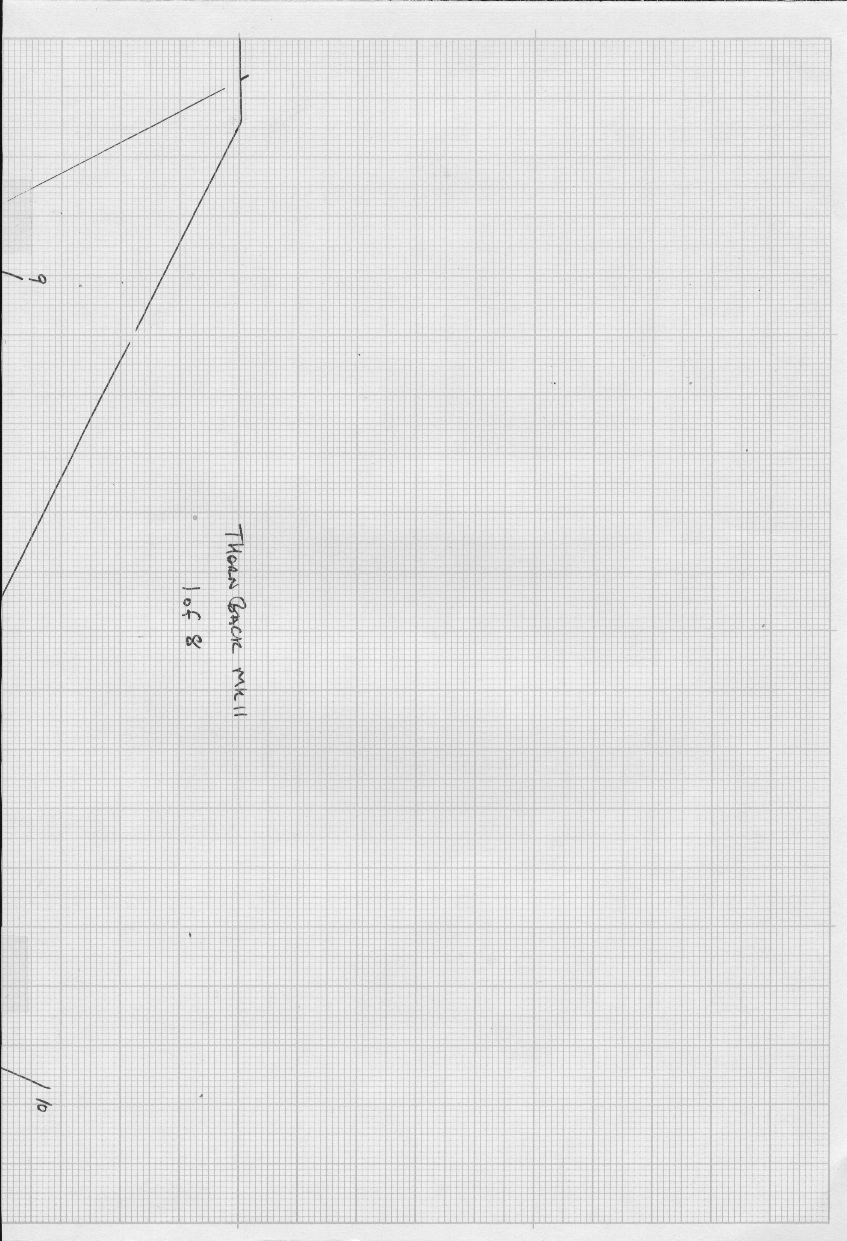
If you use the pdf plan be sure to clear the tick box to Shrink oversized pages to paper size (Acrobat Reader, other pdf viewers may vary). If you do not, your plan will print out undersized! These pdfs have been created for A4 paper. If you want to reassure yourself that the size of your printouts are correct see this sketch with approximate dimensions (I just counted the squares on the scanned graph paper).
I've recently read on Drachenforum some reports that the spine seam appears bent if the DXF format plan is opened in AutoCAD 2004. I've tested it in AutoCAD 2005/2006 without problem but if you use AutoCAD 2004 you should be aware of this and that the seam should be straight.
Chris Taylor (Fool) has created the following plans where the panels are seperated and include seam allowances.
Thanks Chris!
Thornback with 7mm seams (.dxf)
Thornback with 5mm seams (.pdf)
Thornback with 7mm seams (.pdf)
Again, If you use the pdfs be sure to clear the tick box to Shrink oversized pages to paper size (Acrobat Reader, other pdf viewers may vary). If you do not, your plan will print out undersized! These pdfs have been created for A4 paper. If you want to reassure yourself that the size of your printouts are correct see this sketch with approximate dimensions (I just counted the squares on the scanned graph paper).
Maurizio (Maustie) has created a Excel spreadsheet version of the plan too.
Thanks Maurizio!
Mario (Skywolf) has created a colorizer for the Thornback:
Colorizer
Thanks Mario!
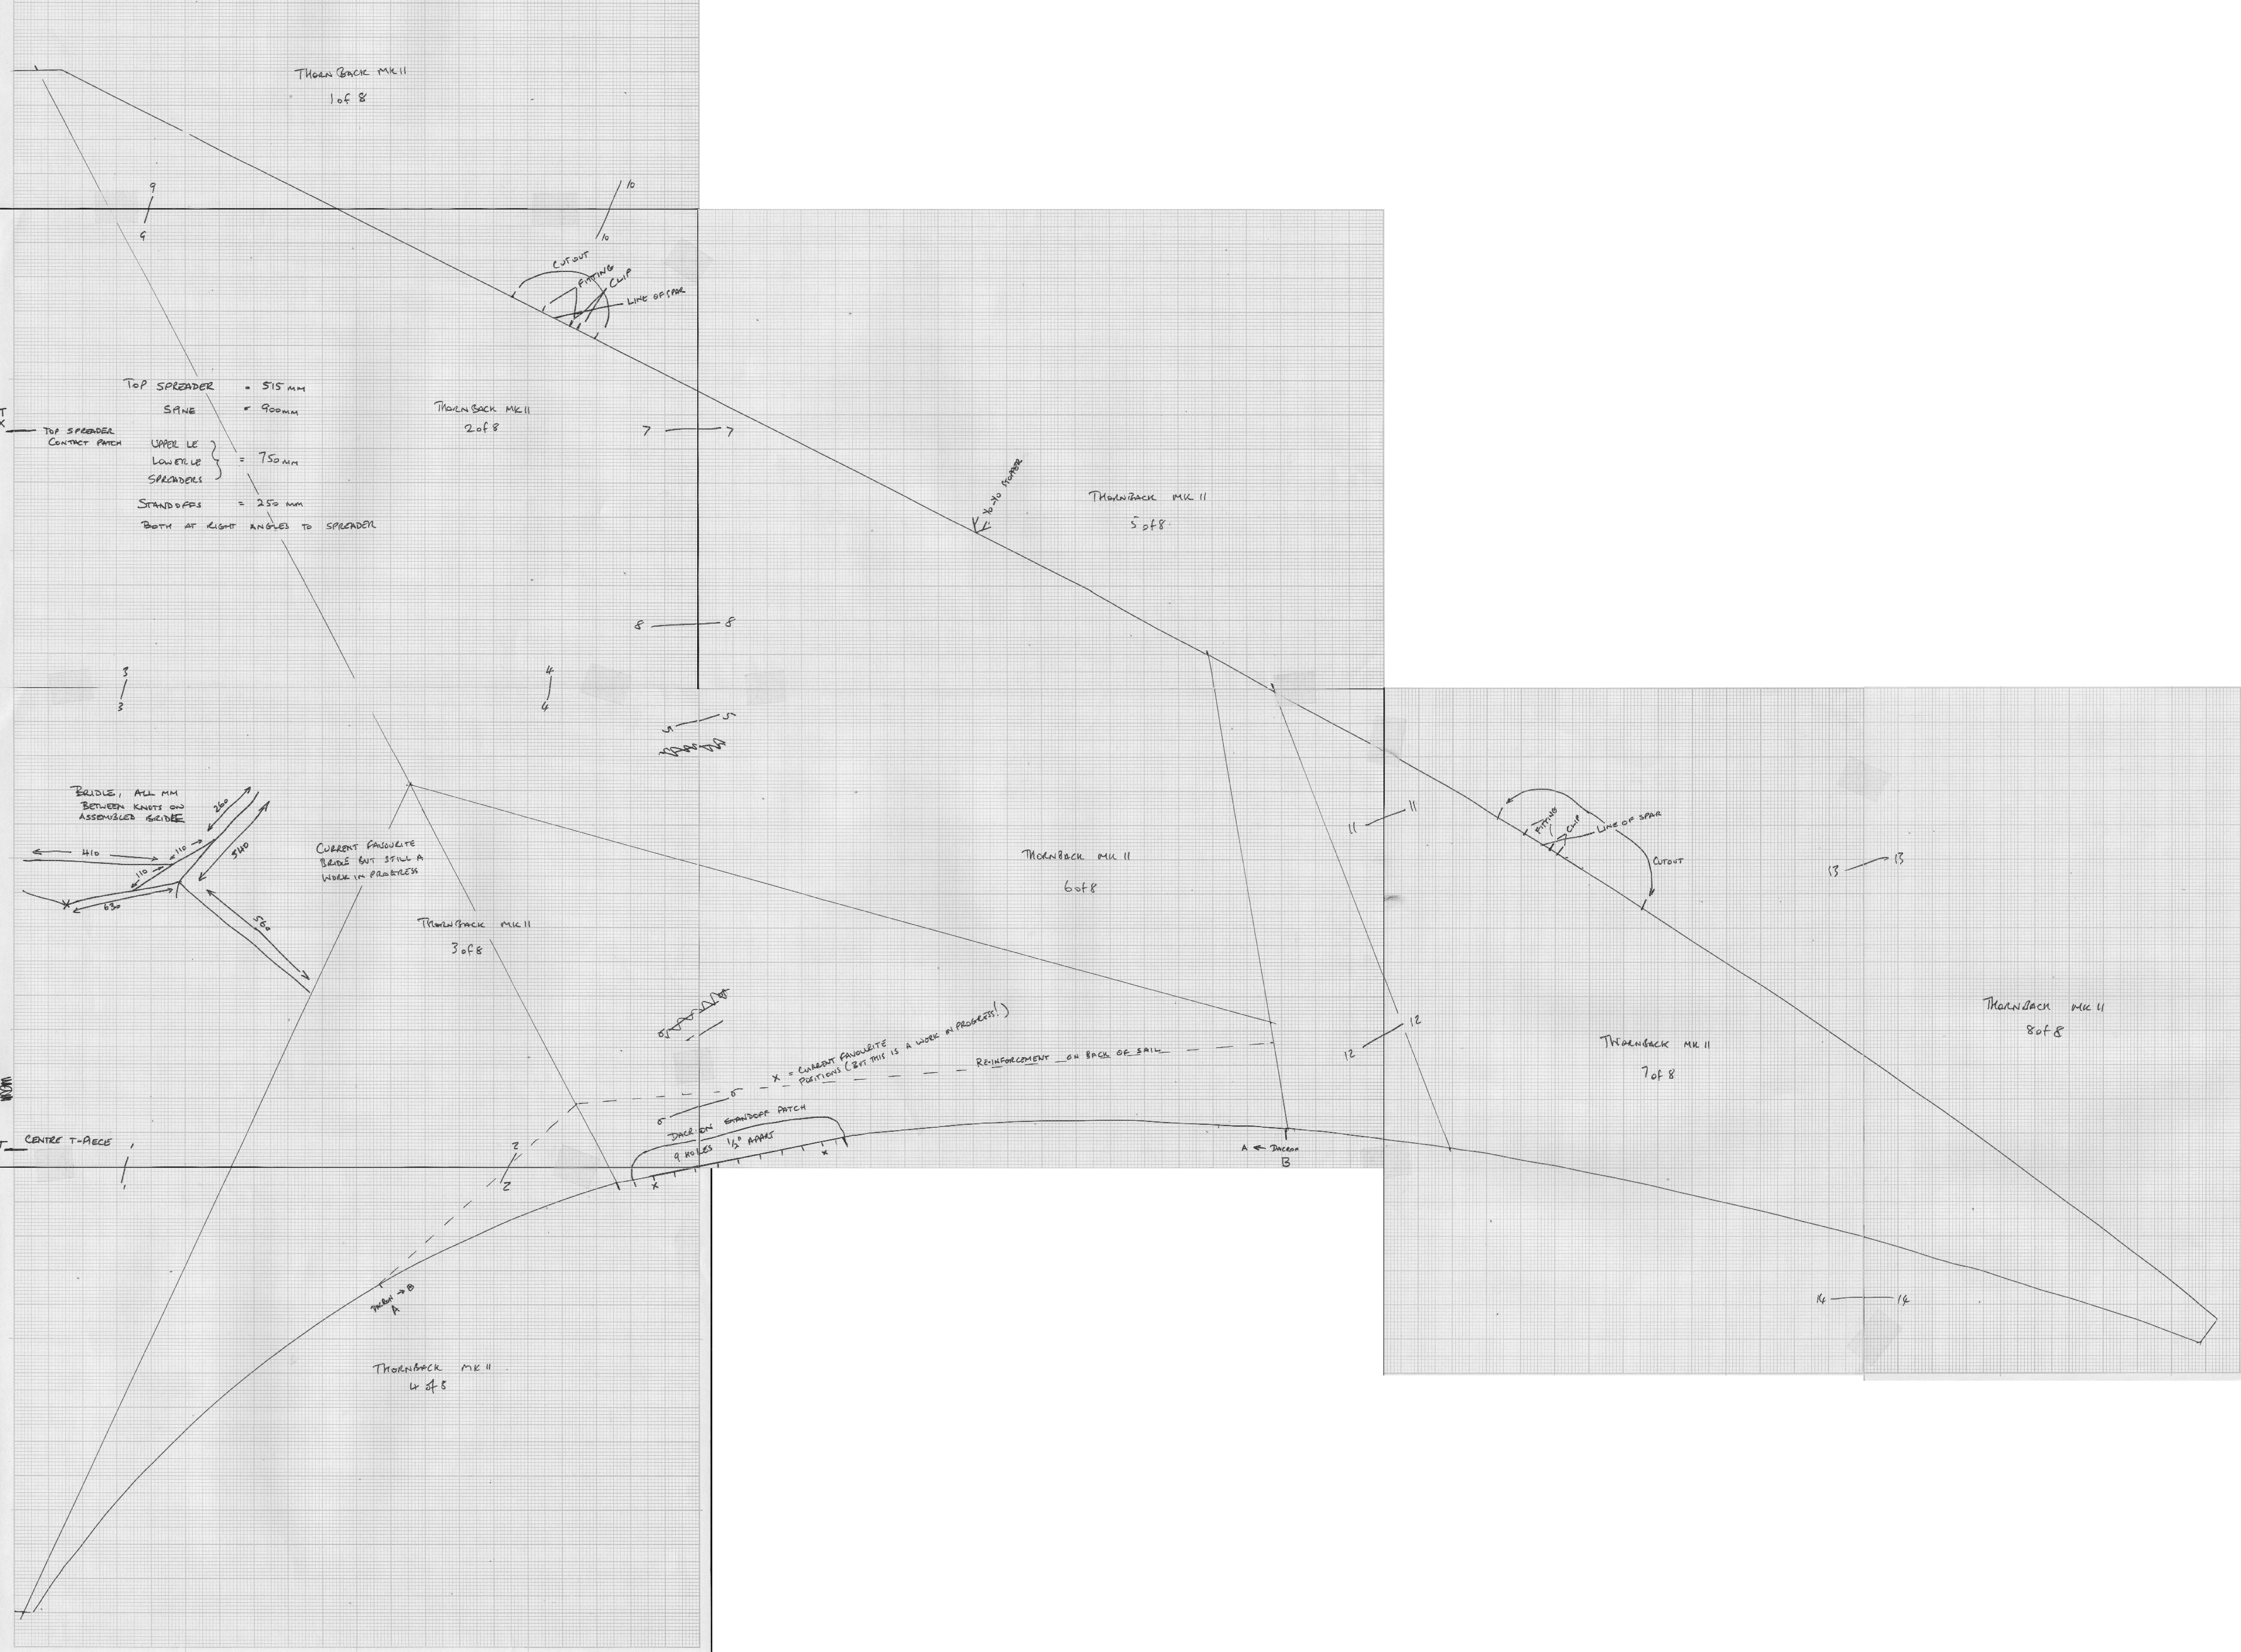
Thornback 2nd prototype 1 of 8
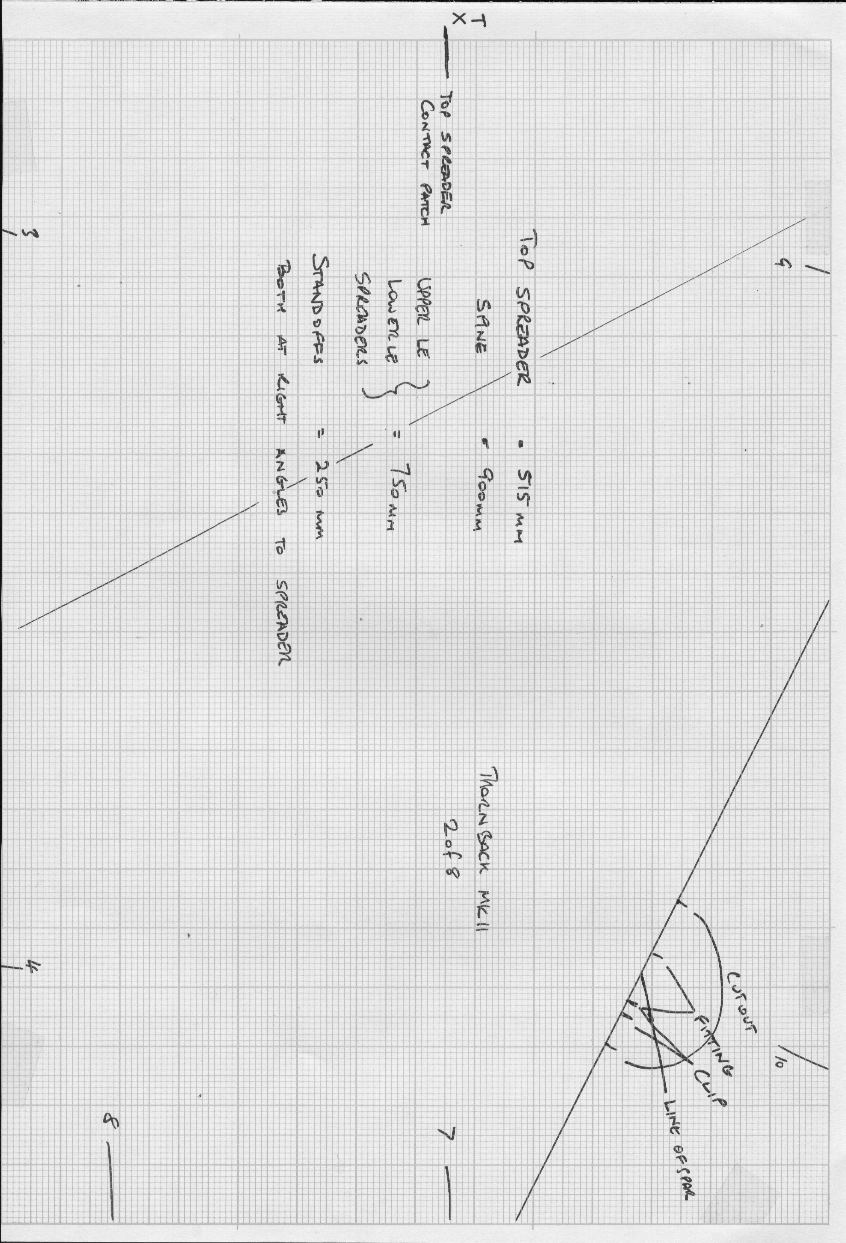
Thornback 2nd prototype 2 of 8
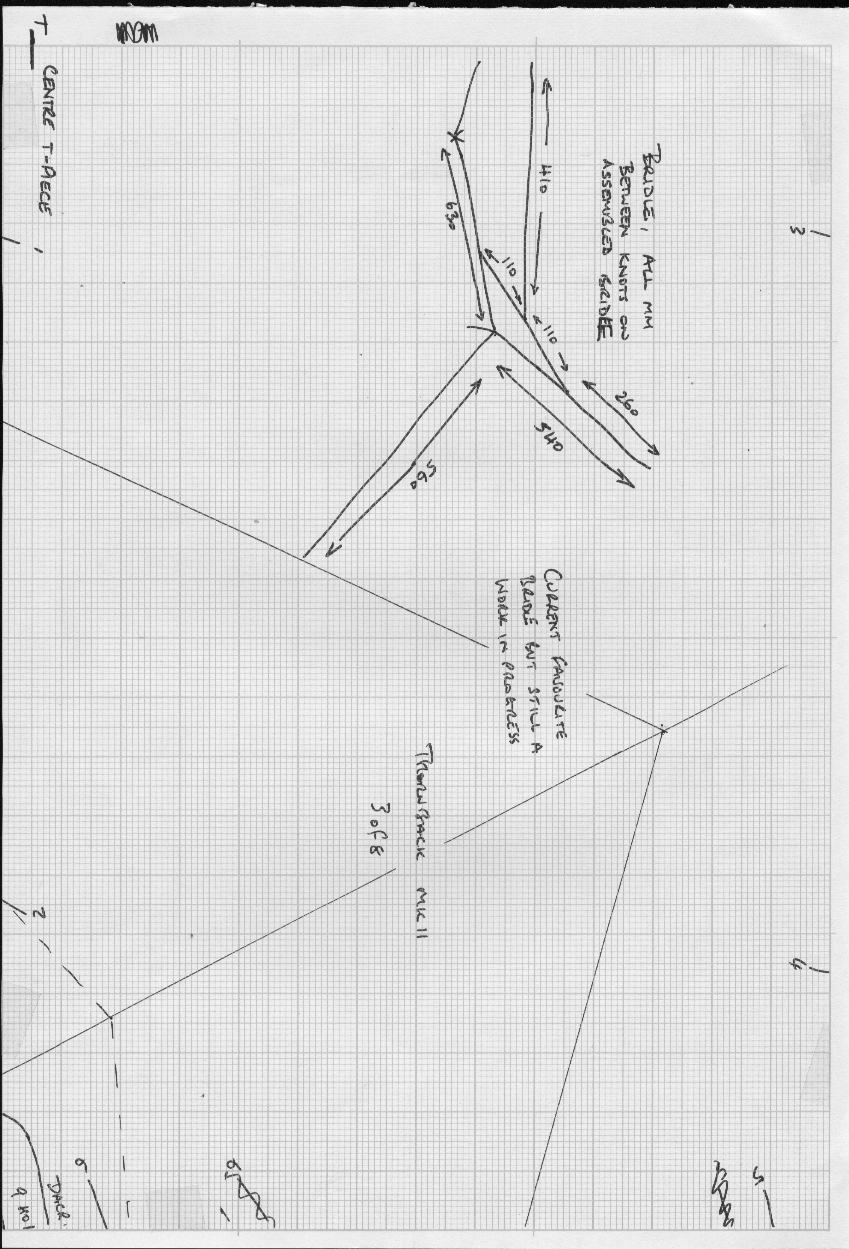
Thornback 2nd prototype 3 of 8
Thornback 2nd prototype 4 of 8
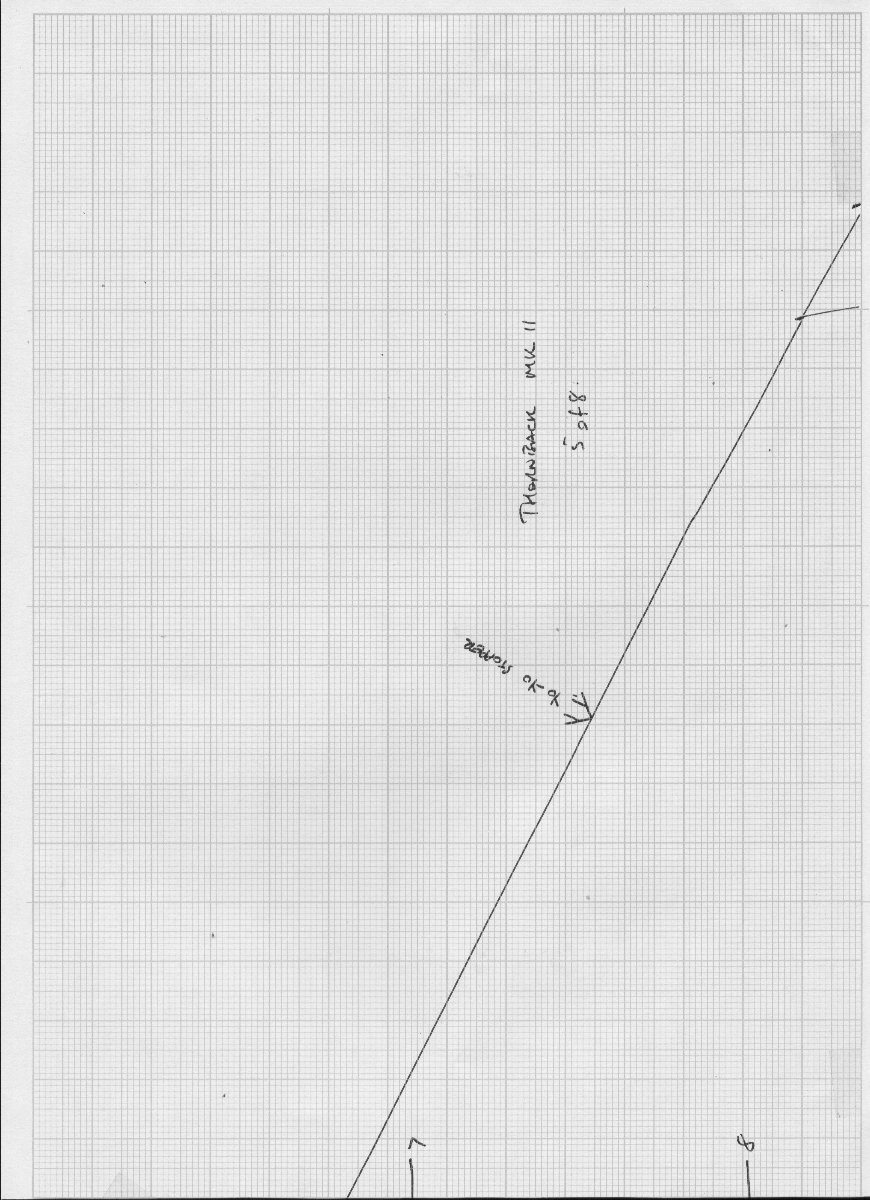
Thornback 2nd prototype 5 of 8
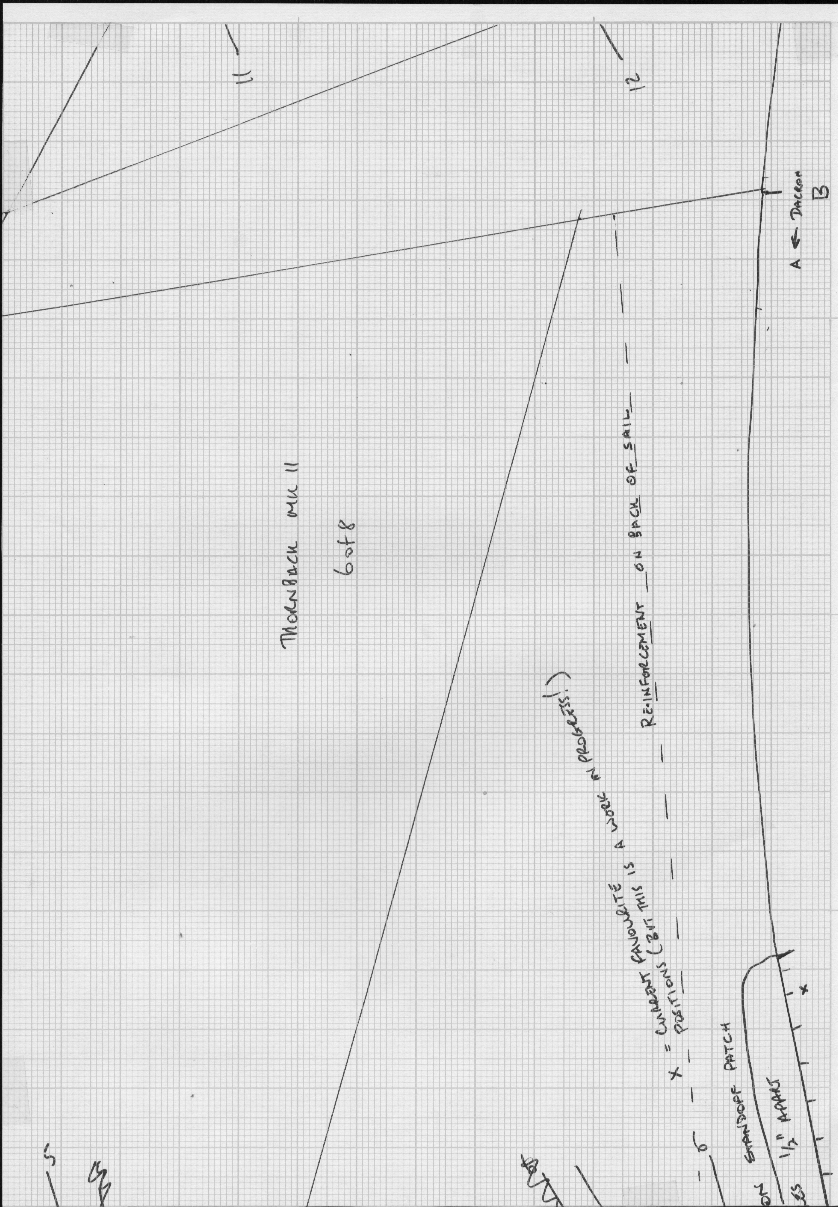
Thornback 2nd prototype 6 of 8
Thornback 2nd prototype 7 of 8
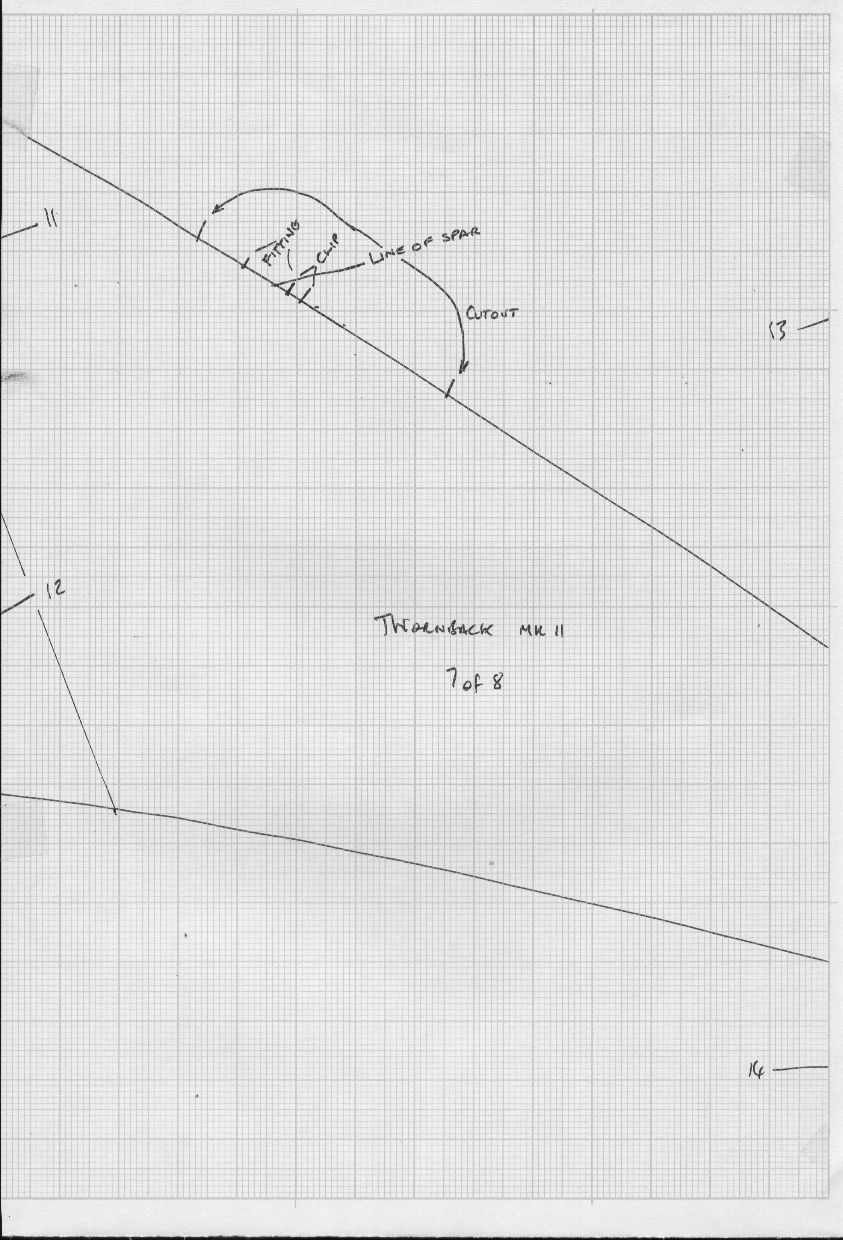
Thornback 2nd prototype 8 of 8
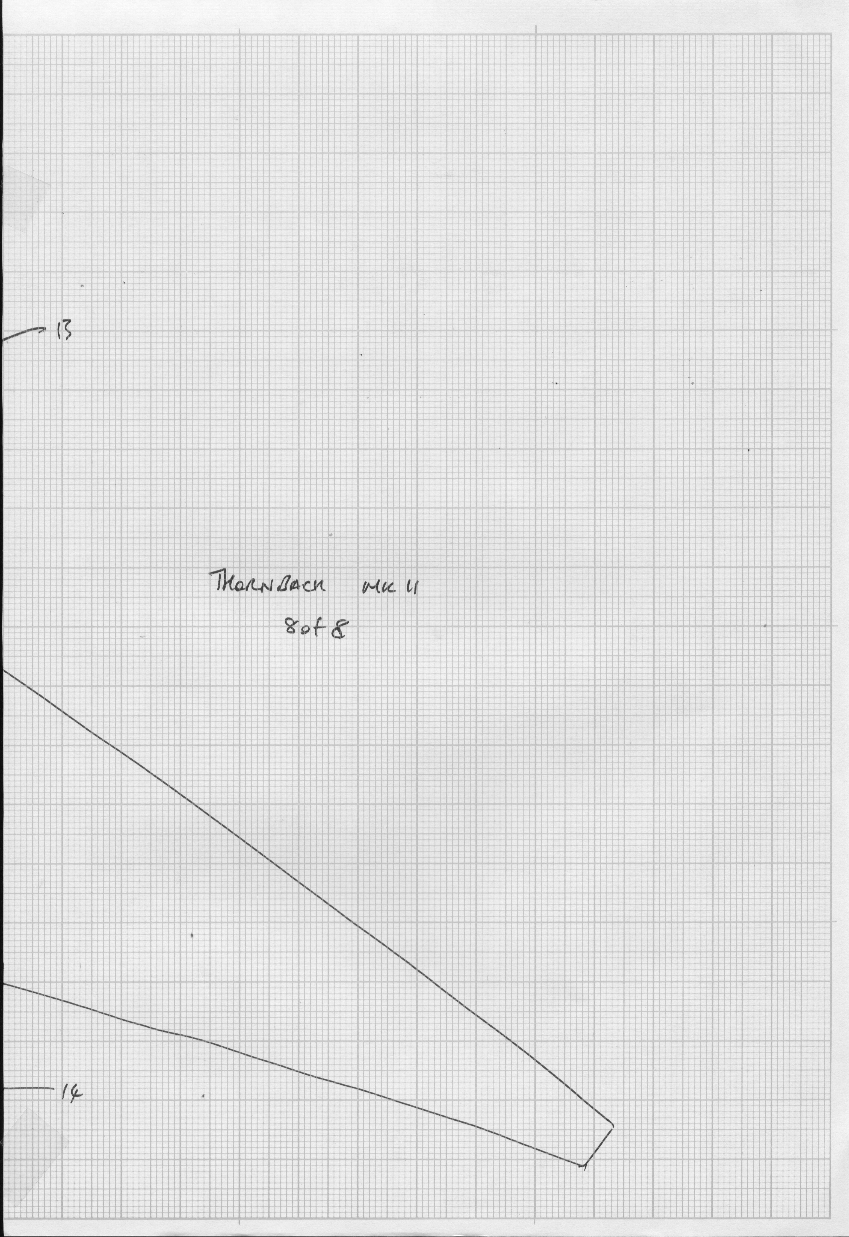
Or... all joined in one huge file (right click and save-as)
Latest Changes
Since this is a work in progress I will put whatever I'm doing to the current version here, especially if it differs from the plan:
- I've given up on the cross active bridle, my current favourite is a 3 point static bridle, diagram below
- I'm back to using the two outermost standoff holes again. This is different to the plan which say one in from each end.
- If you want a faster roll-up when the wind picks up, move the inner standoff out (away from the spine) one or two holes. The tradeoff is that the tail will start to hang low in flat spins
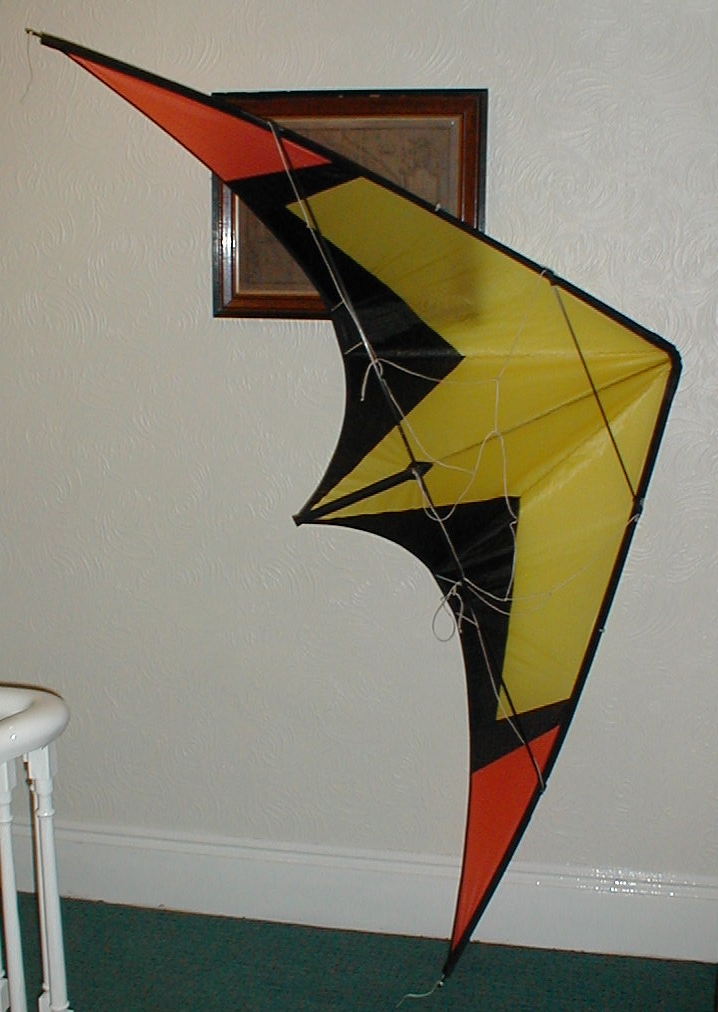
Sail
The sail was made from PC31, the panel layout I used is marked on the plan but if you choose a different layout it would be a good idea to keep the fabric aligned with the trailing edge wherever possible to avoid stretching from too many yo-yos. If you are curious, the layout was inspired by the Highly Strung Aerial.
I made the kite with overlapped and taped seams. I used 3M tape and a serpentine stitch. The serpentine stitch seems to be unique to Bernina machines (I have a 1960's 730 Record) but the 3 stich zig-zag found on Pfaff and other machines would be just as good.
I finished the trailing edge with a 0.5 inch wide strip of Chikara and put in a leech line of 150lb Spectra. The sail is further reinforced with a strip of 50mm wide 1.5oz ripstop on the rear (most people would use mylar but I dont like it personally) and a 25mm strip of dacron folded over the trailing edge where the lines catch in lazies and yo-yos.
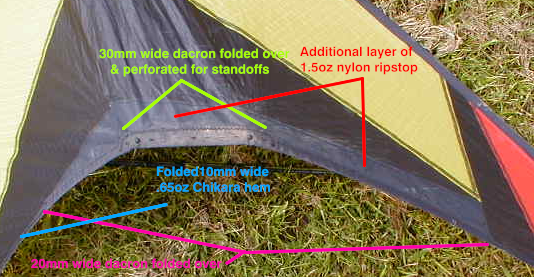
Detail of reinforcement (note for the eagle-eyed: this one has 11 standoff holes rather than the 9 on the plan but the extra ones really are not useful)
Rather than use bungee for the leading edges, I sewed a piece of 150lb rok line between the leading edge dacron and the sail and I simply pull this through the nock, wrap it around the nock four times and tuck it under itself.
Framing
I originally framed the kite in 6mm Epsilon pultruded carbon and used cut down G-Force UL for the spreaders.
- The leading edges 1500mm long. I ferruled mine in the middle making them from two 750mm lengths so I can break the kite down to fit in my short bag.
- The lower spreaders are G-Force UL cut to 750mm
- The spine is 900mm long but I generally cut spines to length on the kite.
- The top spreader is 515mm long
- The standoffs are 250mm long, 3mm carbon (not including the fittings). Both are at right angles to the spar.
- I use Tradewinds leading edge connectors, if you use APAs you will need to adjust their positions.
- I used c-clips below each fitting
However I have since reframed the kite with P200 leading edges, keeping the 6mm spine and G-Force UL spreaders. The kite is MUCH more responsive with stiffer LE's and I'd recommend it to anyone making a Thornback.
I don't normally advocate using tapered spreaders since they bend near the leading edge changing the angle of the outer part of the sail but shortened G-Force UL's are very stiff. Take care if you use alternatives, something like a P200 linear spar might be better than a 3PT since it wont bend near the end.
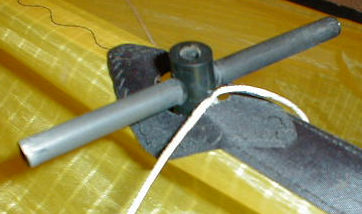
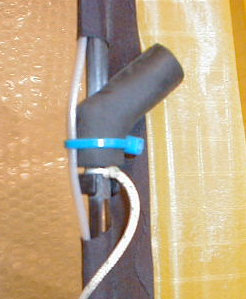
Detail of the T-Piece to match G-Force UL to a 6mm spine. A piece of robust polyurethane tube has two holes drilled through at right angles, the spine goes through one while a piece of P200 went through the other to act as an internal ferrule for the G-Forces. I also put a piece of pultrude inside the P200 just for extra strength.
Bridling
This is my current favourite, a 3 point static bridle:
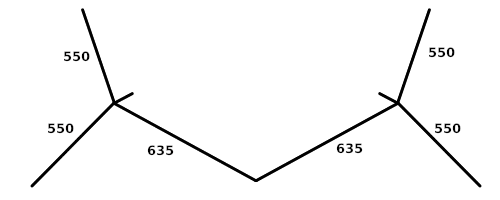
For ease of adjustment I have an adjustment built into the upper outhaul and the inhaul is adjustable too. The upper adjuster is just a pigtail with multiple knots which the outhaul attaches to with a larkshead (as found on some French kites).
This bridle seems to give a much snappier roll-up than the cross-active and better performance at the top of the kites wind range.
This was an attempt at a cross active bridle, its not bad but it certainly isn't perfect. It is a somewhat over-activated and tends to make roll-ups feel soft and sluggish.
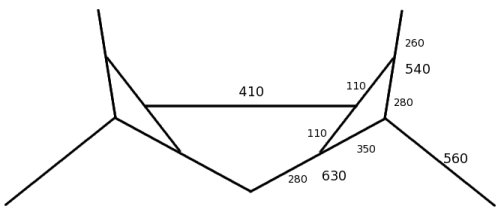
Shortly I'll be replacing this with a turbo or 3 point static bridle which seems to give a much more direct feel to one pop yo-yo's. You can get a feel for it just by taking off the activator legs and flyign the above as a 3 point bridle.
Weights
At first I used a couple of fittings and a piece of brass rod similar to the R-Sky weight kit but a 30g piece of 6mm brass is approx 100mm long so it spreads the weight out too far up toward the T-Piece. What works best for me is up to 30g of lead flashing rolled around the spine as close to the end as possible.
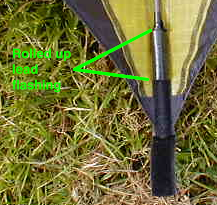
Incidentally, the ferrule in the picture was only put there so I could fit the kite in my luggage when I flew to Cyprus earlier this year. It is not another weight.
Glides
I was too lazy to make a leading edge that covered the fittings, this was only a prototype! I decided to use cable tie off-cuts. I've seen people try to superglue these in which is unsuccesful because superglue does not stick to nylon. I just use another tiny cable tie to hold them in place, it works well and the lines slip over the small tie easily enough.
Tuning
The kite is very adjustable so a few notes may help people get what they want out of this kite
If you want a kite that is easy to Jacobs Ladder and does very easy multilazies put the standoffs in the outermost holes in the standoff reinforcement patch, i.e. inners closest to the spine, outers closest to the tip.
If you want to make the kite very easy to yo-yo move the outer standoff in one hole from the tip end and move the inner standoff to the 4th hole in from the spine. Be warned that the tail will hang down more in rotational moves and multilazies need more care when set up like this.
For easier cometes keep the tail weight down to 15g and move the inner standoffs to the 4th hole (or further!) in from the tail which will help stop it locking into a turtle on the 4th step of the comete.
If you're a beginner or you are used to 90's style kites, please do try to get accustomed to the wide/heavy bridle. It offers much more trick potential and wind range than older style bridles.
Thornback Mk1
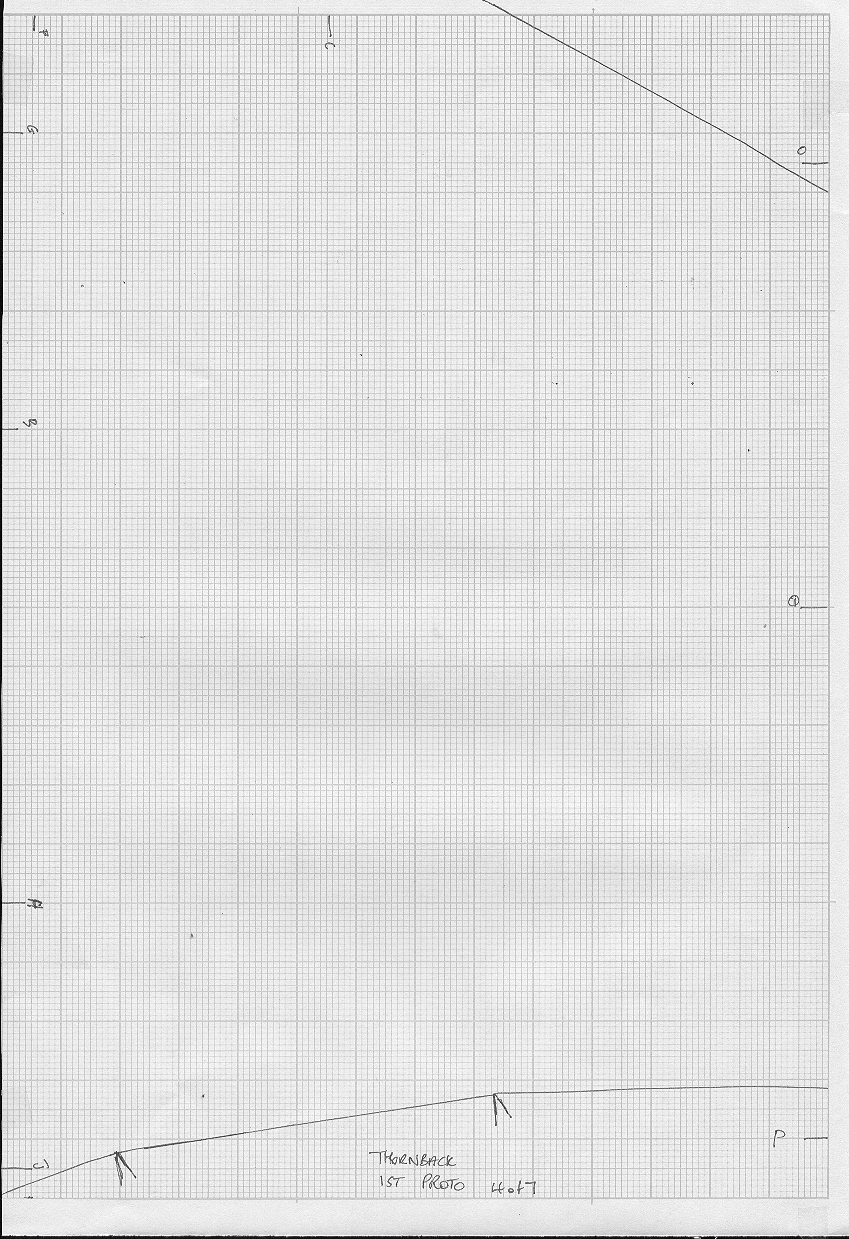
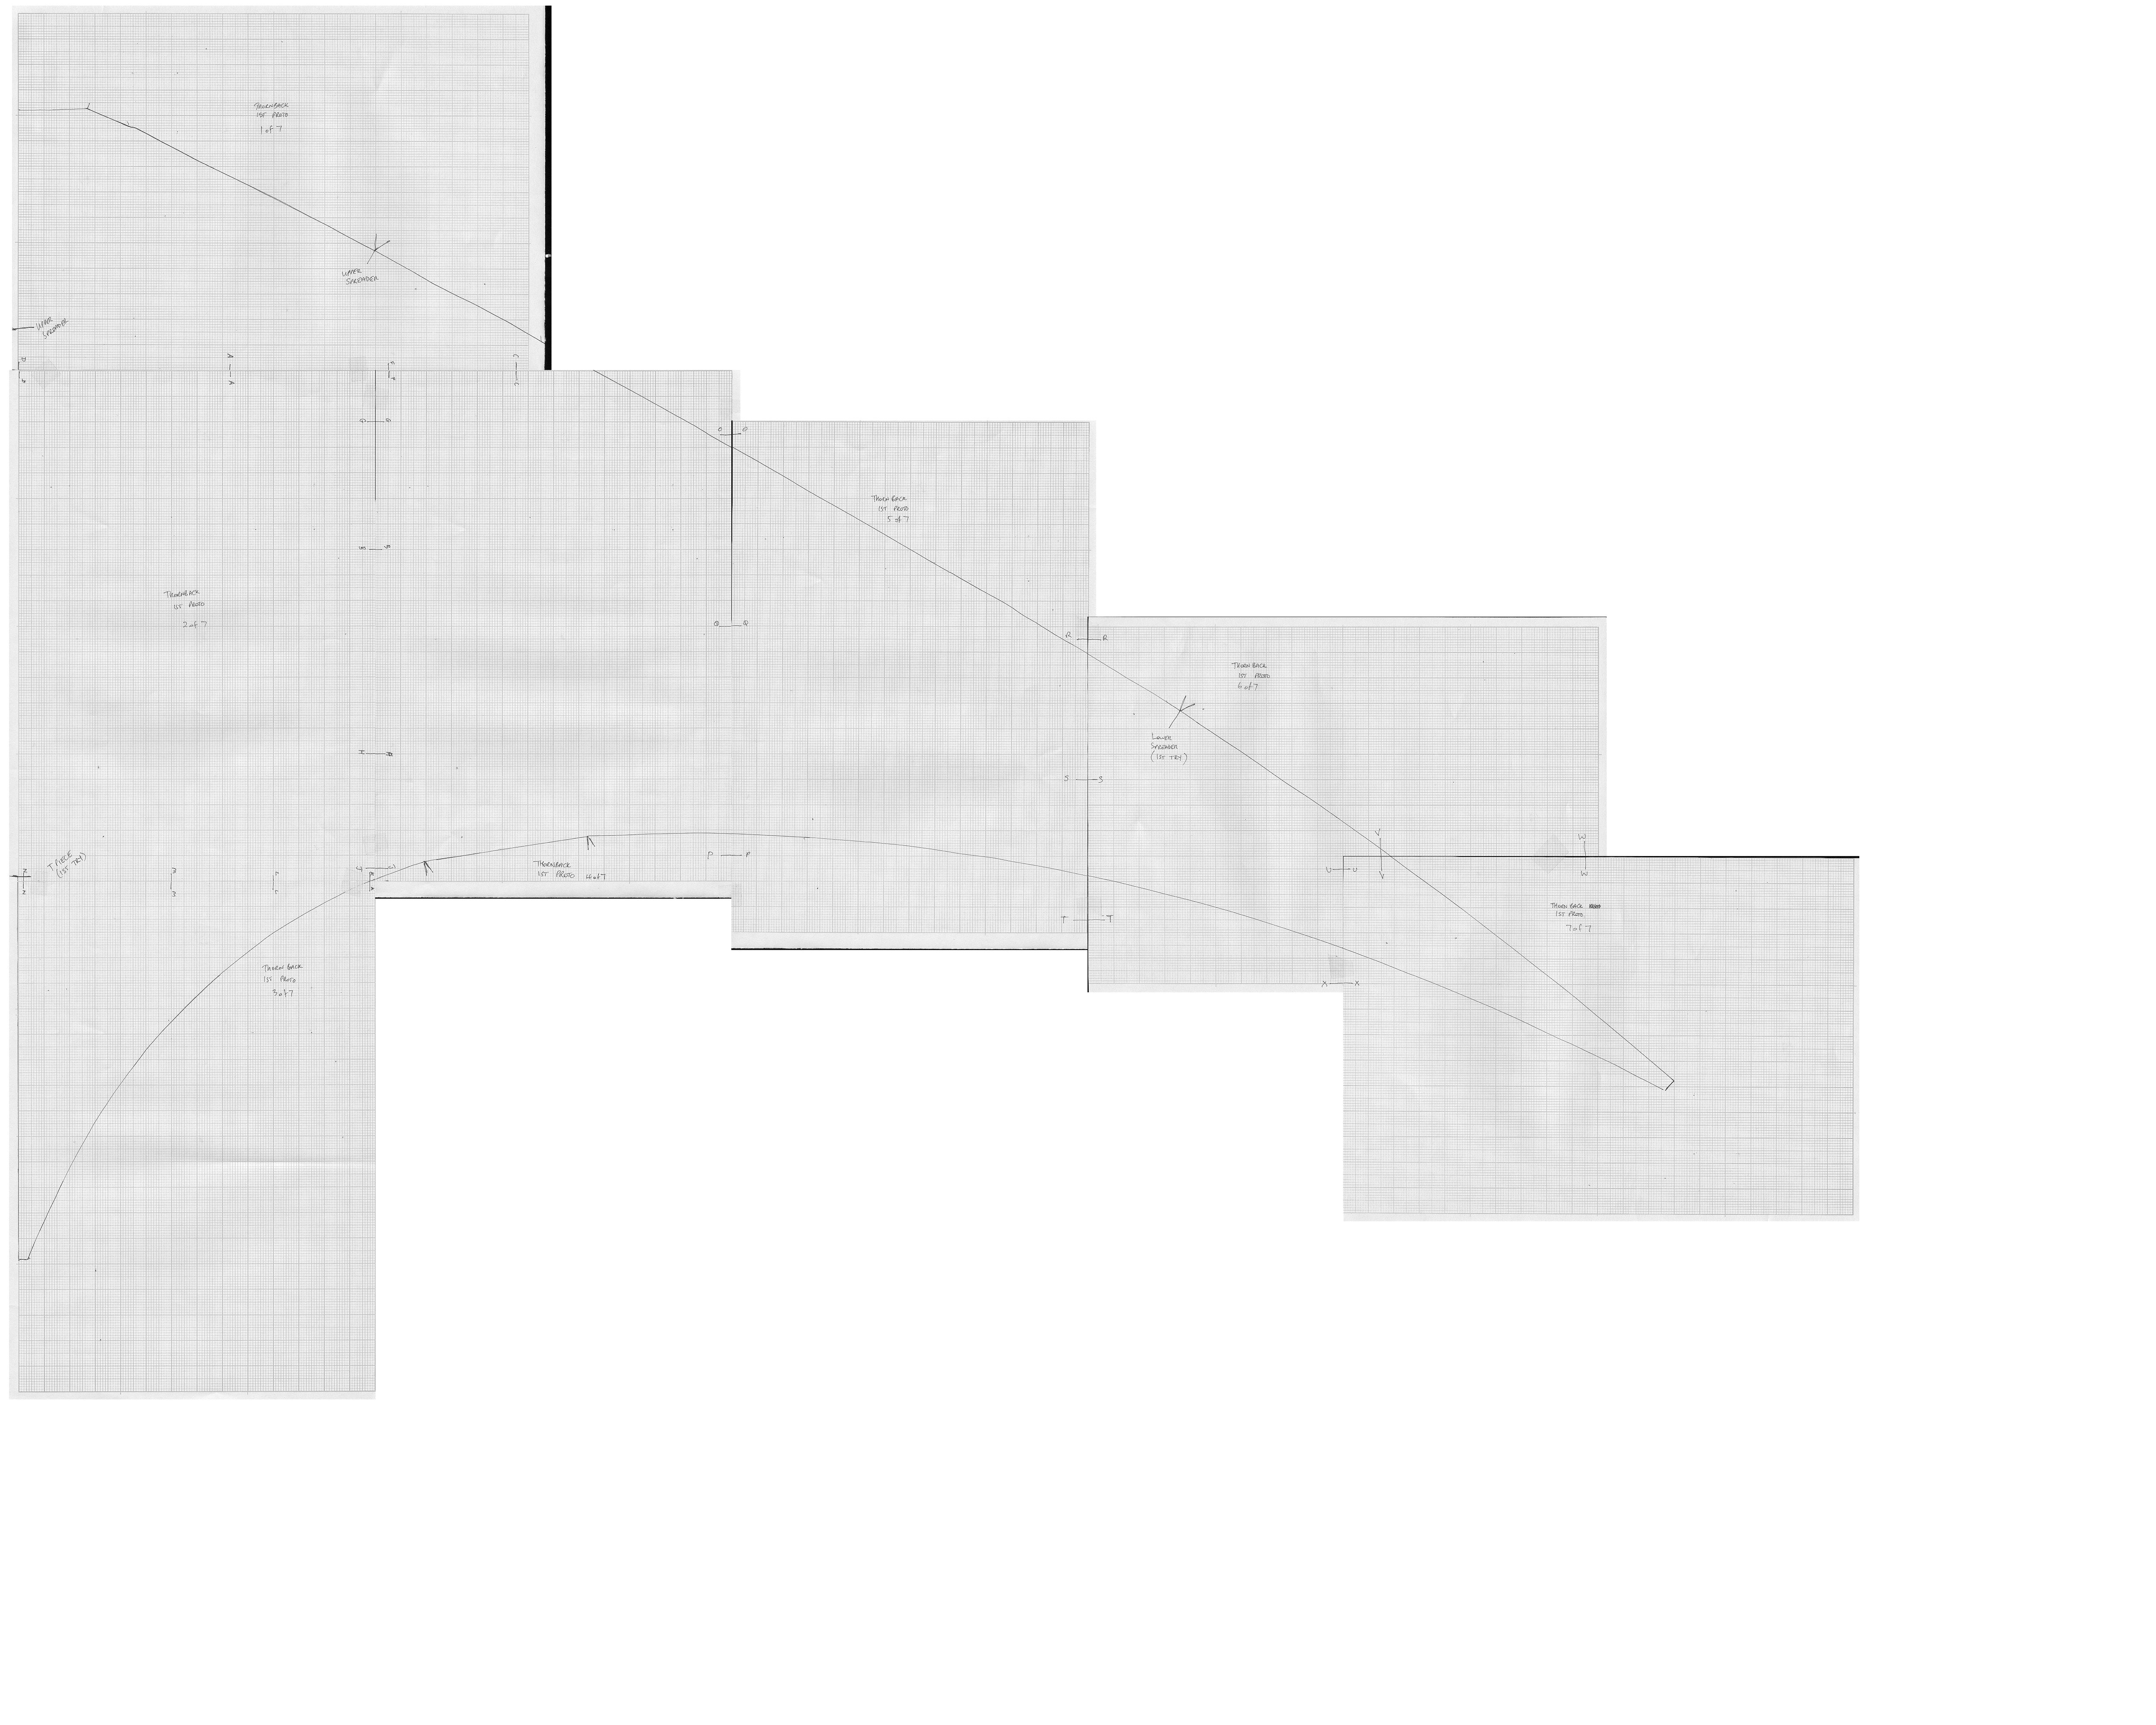
All I've done so far is copy the templates onto graph paper and scan them in (more time consuming than you think!) but if your that keen the scanned images are here until I get them drawn up properly.
Note that these are for the first prototype only, don't bother trying to build this use the plans further above!
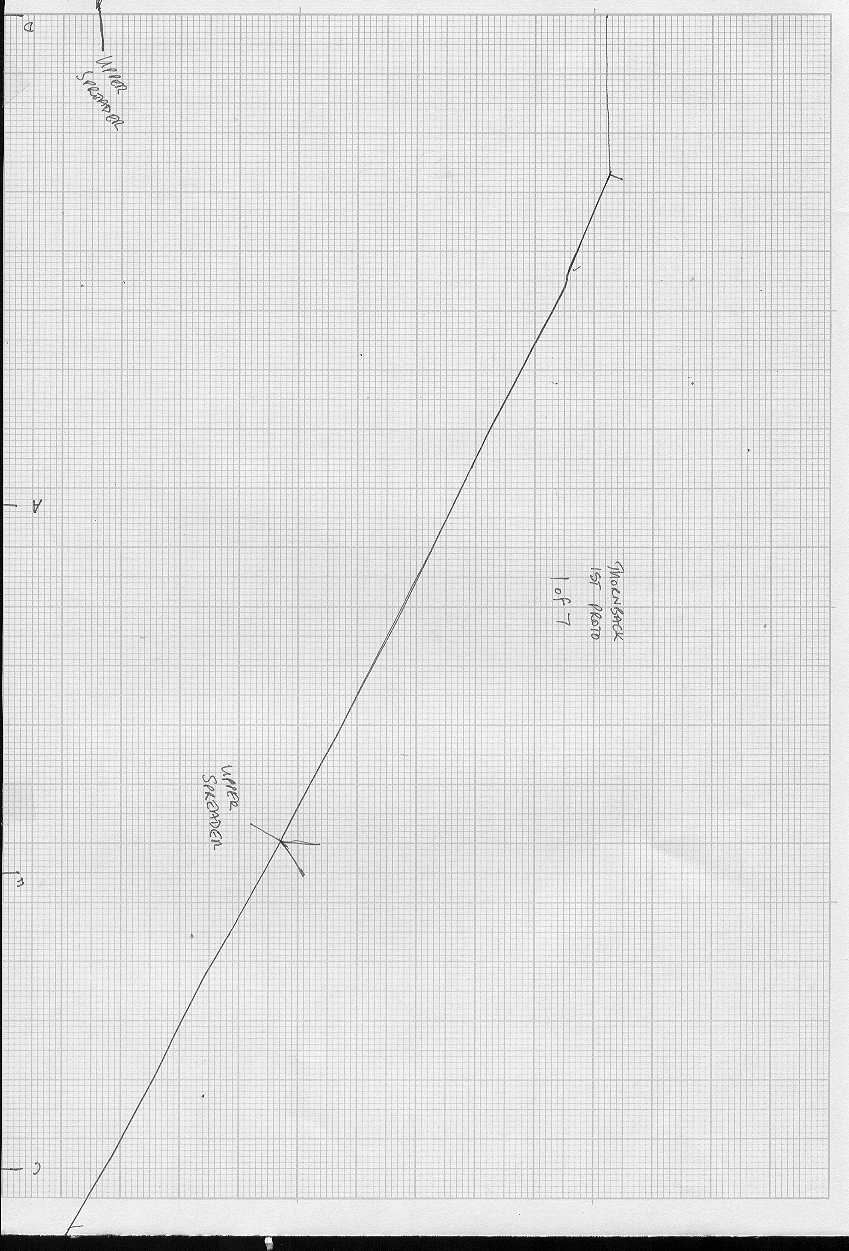
Thornback 1st prototype 1 of 7
Thornback 1st prototype 2 of 7
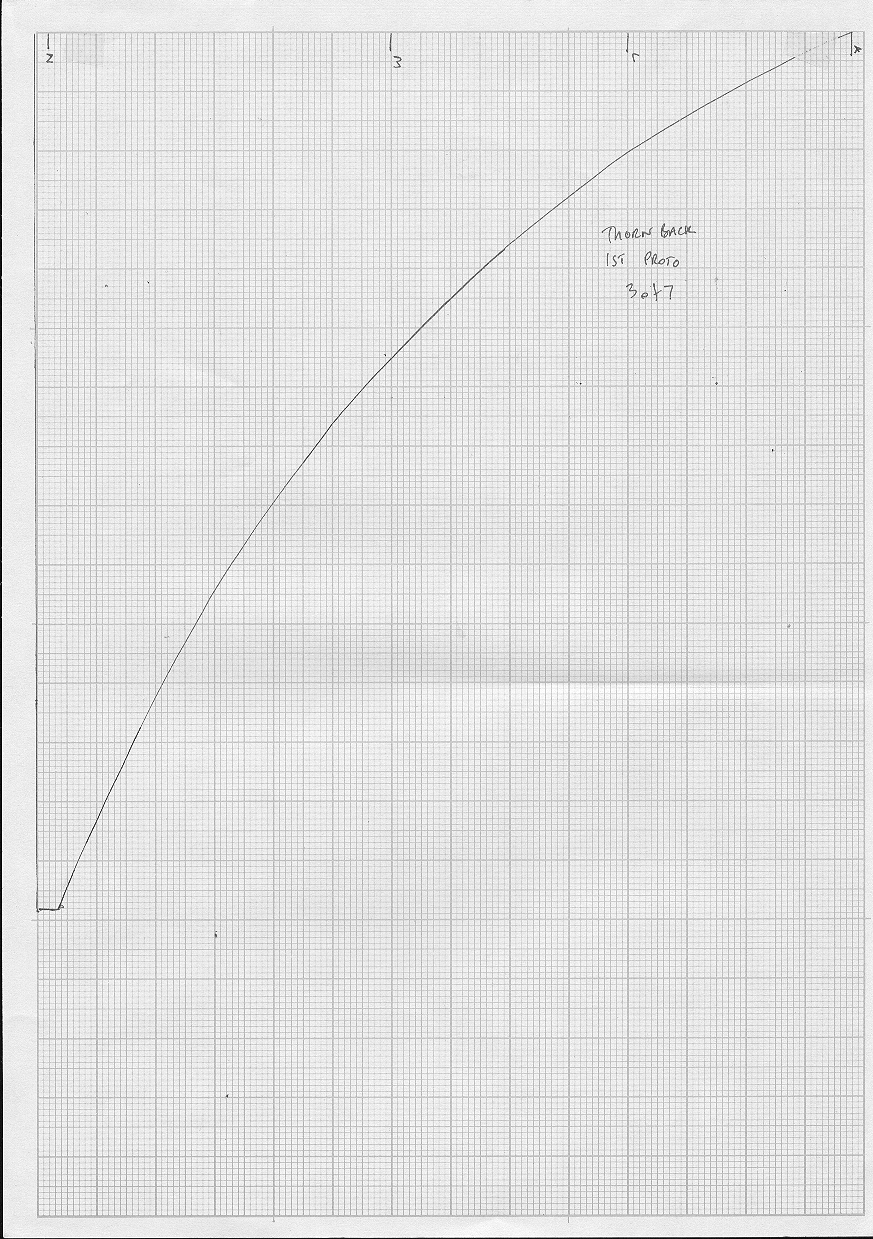
Thornback 1st prototype 3 of 7
Thornback 1st prototype 4 of 7
Thornback 1st prototype 5 of 7
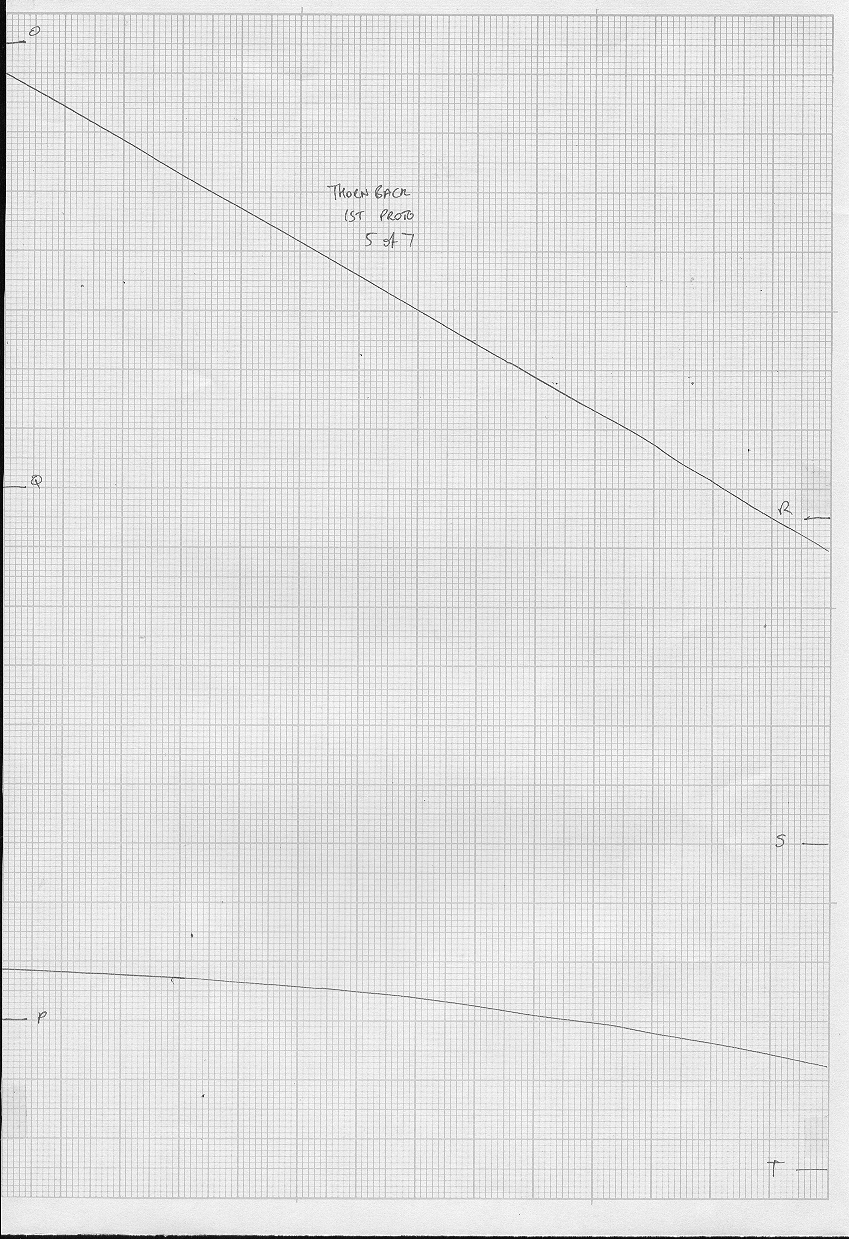
Thornback 1st prototype 6 of 7
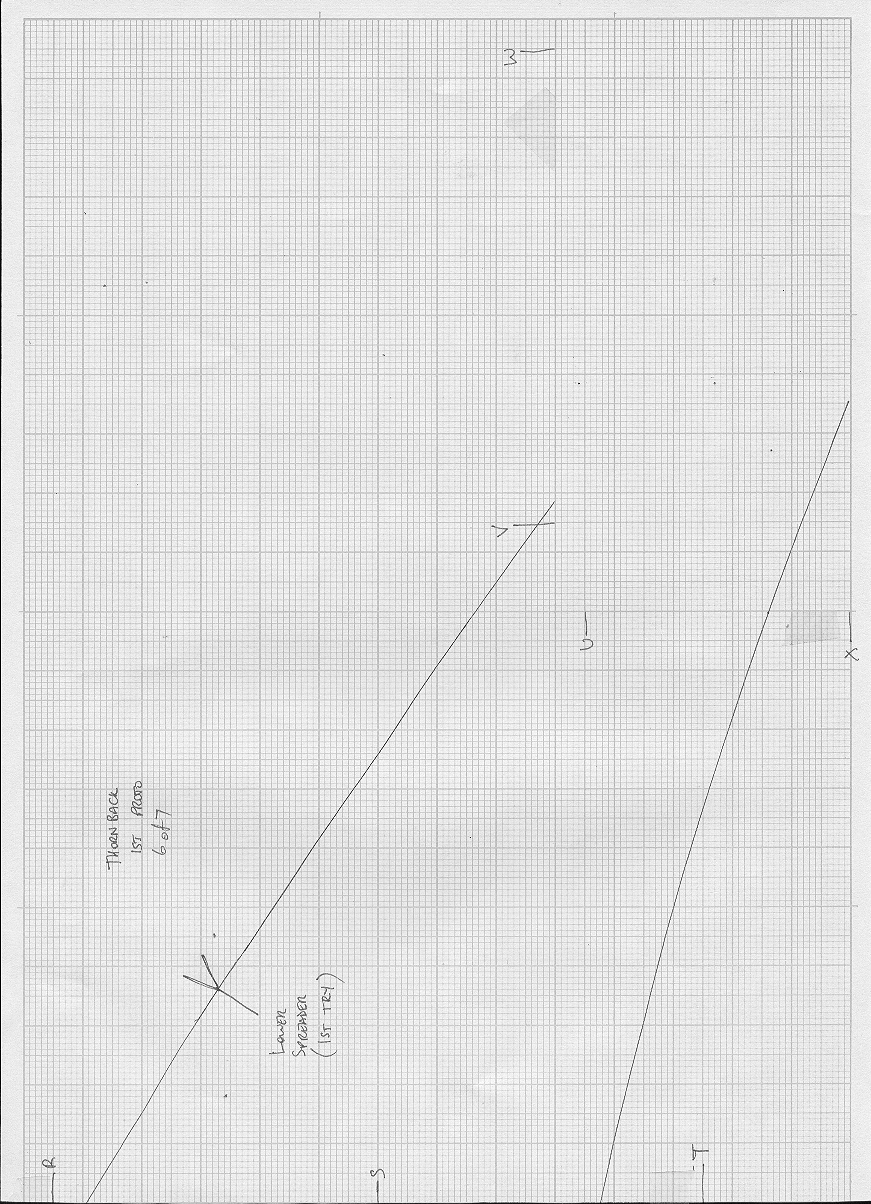
Thornback 1st prototype 7 of 7
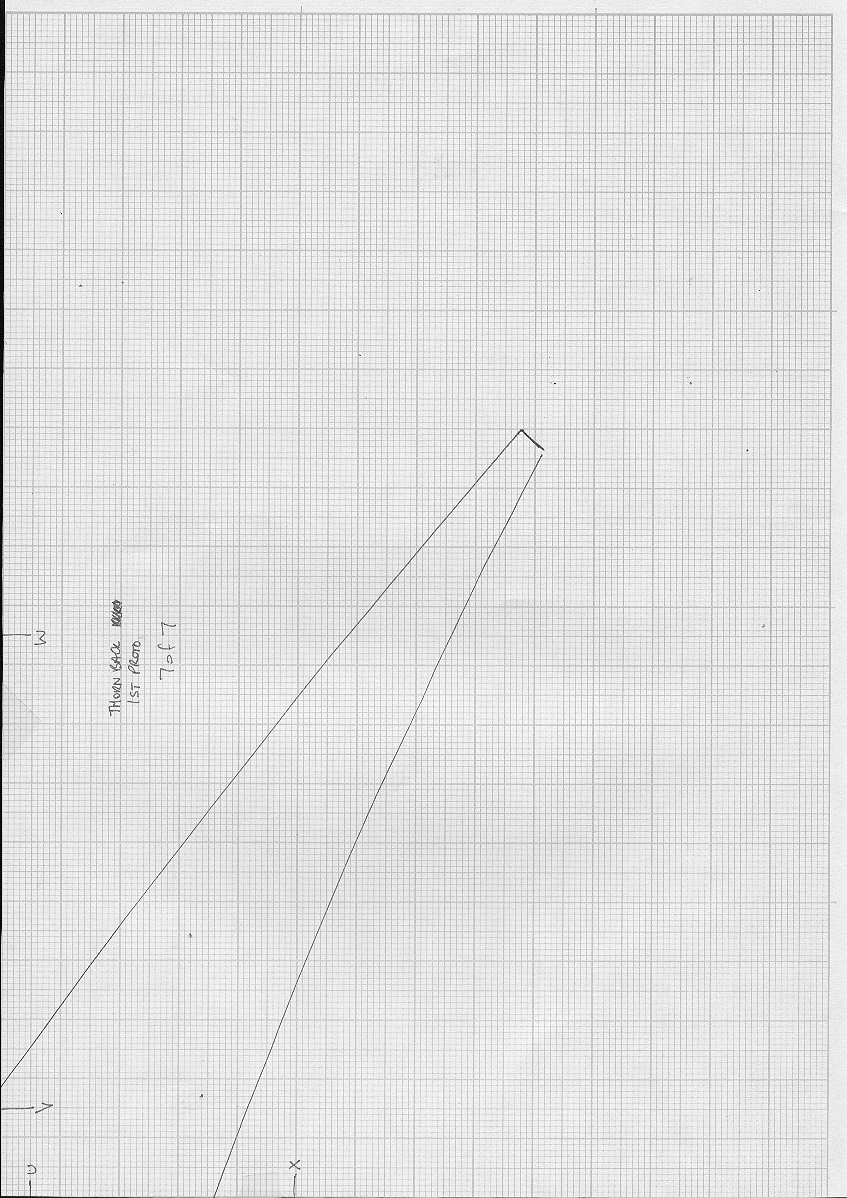
Or... all joined in one huge file (right click and save-as)
kitemaking/plans/thornback.html last modified 19:57:15 30-Jul-2017

This work is licensed under a Creative Commons Attribution-NonCommercial-ShareAlike 2.0 England & Wales License.